Fowl Engine 2.0
 |
|

Dynamic Campaign System |
Fowl Engine is a Rust-powered persistent war for DCS — the same strategic depth you want from a campaign, with the stability and persistence you expect from a serious multiplayer server. |
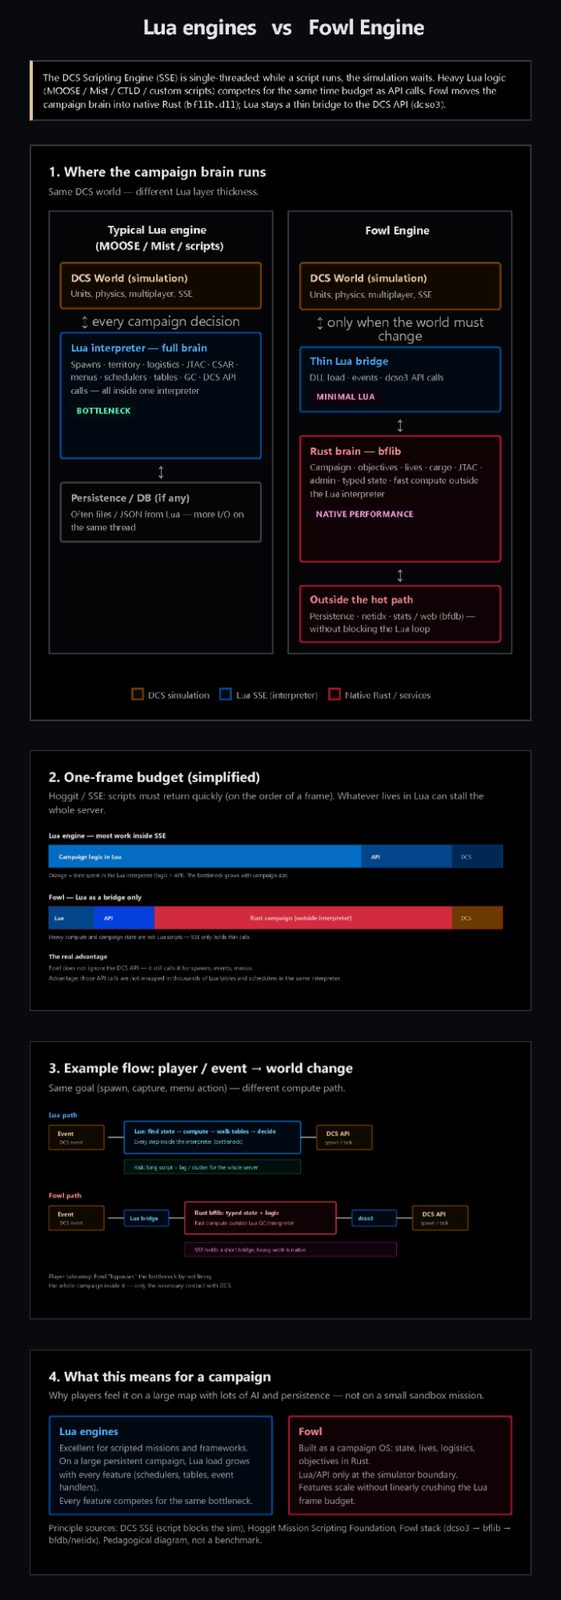
Most DCS campaigns rely heavily on complex Lua scripting engines. They work well enough—until the dynamic campaign runs for days, player counts spike, and something quietly breaks under the hood. Fowl Engine is built differently. The heavy lifting is handled in Rust—a modern, compiled language engineered from the ground up for absolute reliability and raw speed. You don't need to be a programmer to appreciate the tech; you’ll feel it in how the server performs.Where standard Lua scripts inevitably tangle into a fragile web of global tables, timers, and hidden dependencies, the Fowl Engine maintains the entire campaign state within a strictly typed, persistent architecture. Logistics, slot management, player lives, queues, and objectives no longer rely on the hope that a script doesn't crash mid-session; instead, they run seamlessly inside a native DLL designed for grueling, multi-day operations. Furthermore, Rust's compiler eliminates an entire class of bugs before the mission even boots—catching type mismatches, invalid states, and typos that interpreted Lua would only expose at runtime, usually right in the middle of a massive weekend event. When the server is packed on a Saturday night, the difference isn't just a marketing claim—it means zero silent failures, no more random "why did spawning stop?" bugs, and rock-solid predictability. In DCS, Lua is single-threaded and interpreted, meaning all script logic fights for the exact same CPU time slice as the core mission. Under heavy load, this translates directly to bloated server ticks, delayed event triggers, and micro-stutters exactly when player activity peaks. Fowl operates as a compiled, native DLL. Because it bypasses runtime interpretation, the exact same campaign logic executes over 100 times faster. Crucially, it can offload intensive computations across multiple CPU cores, keeping the main DCS thread highly responsive. Memory management is equally vital: instead of uncontrolled Lua table bloat and unpredictable garbage-collection spikes, Rust enforces strict allocation control. This results in stable, predictable RAM usage over long server uptimes and eliminates those mysterious, mid-session frame-rate drops. Fowl is engineered for what a multiplayer dynamic campaign actually demands: compile-time bug prevention before it affects players, native DLL velocities, unyielding performance under load, multi-core processing that escapes the single-thread bottleneck, and an architecture that scales with player count and session length—not against them. You don't need to understand Rust. You will feel it in the snappiness of the server, the stability across days of continuous uptime, and a campaign that stays lightning-fast even when the map is entirely full. |
 |
LICENSE
Fowl Engine is free software licensed under the GNU Affero General Public License version 3 (AGPL-3.0) — the same license that covers the main campaign library. You can use it, study it, change it, and share it. What follows is a plain-language summary of what that means for players, server hosts, and anyone who builds on the engine. It is not legal advice; the full terms are in bflib/LICENSE.
What you may do
Run Fowl Engine on your machine or multiplayer server, for free or commercially.
Study the source code and learn how the campaign works.
Modify the engine for your mission, server, or fork.
Distribute original or modified copies, including charging for hosting, support, or packaging if you choose.
What you must respect
Keep it free. If you distribute Fowl Engine (or a modified version), you must license that work under AGPL-3.0 and pass on the same freedoms to recipients.
Share the source. When you convey a binary or a modified build, you must also make the corresponding source available under AGPL terms.
Network use counts.
AGPL is designed for software used over a network. If you run a modified version on a publicly accessible server and players interact with it remotely, you must offer those users a way to obtain the corresponding source of the version you are running — at no charge, through a normal means of software distribution.
No warranty.
The software is provided “as is,” without warranty of merchantability or fitness for a particular purpose. You use it at your own risk.
Related components
The DCS Lua API bindings (dcso3) are separately licensed under the MIT License. That is a permissive license for that crate alone. The Fowl Engine campaign itself remains AGPL-3.0.
Bottom line
You are free to use and improve Fowl Engine. If you share it, change it, or host a modified build for others online, keep the source available and keep the AGPL freedoms intact. For the exact legal terms, see bflib/LICENSE and gnu.org/licenses/agpl-3.0
Fowl Engine 1.0: https://github.com/estokes/bfnext
Fowl Engine 2.0: https://github.com/dcs-scallion/DCSfowlengine
About dcso3 and its license
Fowl Engine talks to DCS through dcso3, a separate Rust crate that provides a minimal, typed binding to the DCS Lua scripting API. dcso3 is licensed under the MIT License (see dcso3/LICENSE). Copyright 2024 Eric Stokes.
Under MIT you may use, copy, modify, merge, publish, distribute, sublicense, and sell copies of dcso3, including in commercial products, provided you keep the copyright and permission notice in copies or substantial portions of the software. The software is provided “as is,” without warranty.
Important distinction
MIT applies to dcso3 alone. The Fowl Engine campaign library (bflib) remains under the GNU Affero General Public License version 3 (AGPL-3.0). Using or linking dcso3 does not change that: if you distribute or run a modified Fowl Engine, AGPL obligations for bflib still apply. Mission content (for example .miz files) is separate creative/data work and is not automatically covered by either license.
Servers Information
DCS server 1 (open Beta) | |
Name: ▌ATTRITION▐ Persistent 24/7 Strategic PvP | BETA▐ DCS IP address: 78.80.144.178:10308 Main radio frequencies 240.000 MHz AM 120.000 MHz AM | |
| |
Name: ▌ATTRITION▐ Persistent 24/7 Strategic PvE | TA | BETA▐ DCS IP address: 78.80.144.178:10309 SRS IP address: 78.80.144.178:5003 Main radio frequencies 240.000 MHz AM 120.000 MHz AM | |
|
Rules
Server Rules 1) Combined Arms Operations Control units only in first person through Combined Arms or via the relevant -action move command. Any actions designed to disrupt server mechanics are forbidden.
Do not abuse any exploits or bugs, whether related to the server or DCS itself. If you find a bug, post it in the #bugs or #development channel. Continuous use of an obvious exploit before a fix will lead to a retroactive ban.
Do not teamkill deliberately. Accidental teamkills happen and will not be punished, but we will ban pilots who deliberately or continuously kill friendlies. Always identify your target via IFF or SRS before engaging. Cease fire immediately if you hit a friendly or get warned in the game chat.
No taxiway or apron takeoffs. Runways are there for a reason. Saving 15 seconds is not worth risking a collision with taxiing pilots or AI aircraft.
We do not allow more than one account per person on The Attrition to prevent system exploits. Using multiple accounts will lead to a permanent ban. Second DCS client for map/intel while flying is multi-accounting / exploit. Playing from the same household or LAN is allowed if each person uses their own DCS account and Discord link. Sharing a public IP by itself is not a violation.
If your aircraft is undamaged and you have fuel, do not eject just to deny your opponent points for a kill. The server will issue an automatic penalty for doing so.
Do not use the in-game chat to promote, link, or advertise your own social media, streams, Discord channels, or other DCS multiplayer servers.
Intentional ramming of aircraft, ground vehicles, or structures is forbidden and may result in a ban. |
Streaming Rules 1) Streaming GCI & F10 Map If you stream your GCI gameplay—whether using the F10 map or other tactical tools—you must set a 10-minute stream delay.
2) Raw Map & Comms Streaming Do not stream only the F10 map or radio comms without any personal interaction or commentary (for example, to provide a live tactical feed to your squadron or team). |
Code of Conduct
|
Campaign Administration If one coalition gains clear dominance, the winning team is expected to push and finish the campaign. If the winning coalition shows no meaningful offensive activity (for example no ground pushes or airbase assaults) for 72 consecutive hours, server administration may end the campaign early. |
Live campaign map
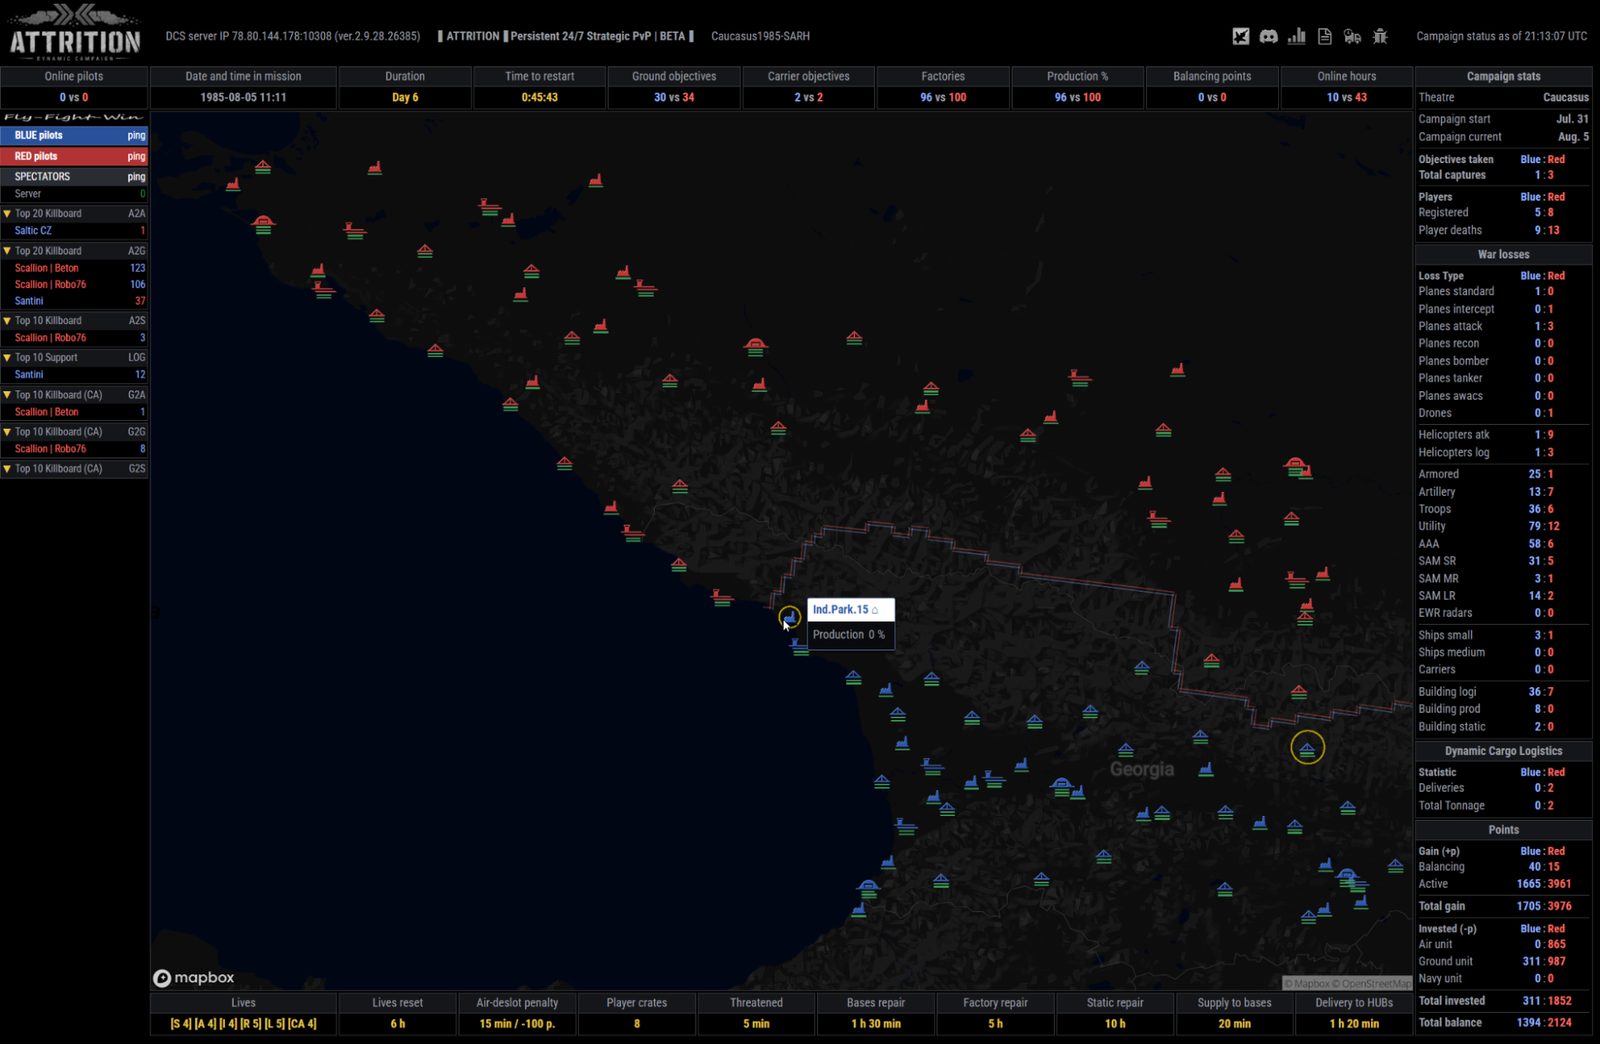
When running on a mission server, its engine generates an interactive HTML campaign map that updates automatically. |
Live map DCS server 1: https://server1.attrition.cz/map Live map DCS server 2: https://server2.attrition.cz/map |
 |
PvP Guide

THIS IS A WORK IN PROGRESS |
The "ATTRITION" guide is under active development and is continuously updated. Information is subject to change as development moves quickly and bugs are patched. This draft has not been proofread; please excuse any typos or phrasing errors. |
last edit: September 18, 2026 |
First Steps
Are you new to the server, learning how the battlefield flows, or unsure where to start? Use these fundamental strategies: |
1. The Campaign Goal: Win the campaign by destroying all enemy bases and aircraft carriers. Capitalize on windows when no opposing players are online to block your progress. If enemies do join, shift your focus to the opposite side of the map; they cannot defend every sector simultaneously. Opponents will be forced to choose between a stalemate or splitting up to secure their own sectors. When heavy fighting stalls the map for hours, you will appreciate taking a quiet slot or working with a small group of allies to capture bases easier. 2. Target Low-Defense Logistics: Begin by striking faintly defended logistical outposts (LOG FOBs or standard FOBs). Focus on neutralizing all defensive and logistical structures; zeroing them out drops the base into a neutral state, stripping ownership from the enemy. Even if you cannot immediately deploy capture troops, neutralizing the sector forces the enemy to spend time recapturing it without earning any offensive points. 4. Maintain Safe Altitude over Unexplored Sectors: When entering unreconned territory, maintain a radar altitude of at least 8 km (approx. 26,000 ft) to stay clear of hidden, secretly deployed low-altitude ground threats. At this altitude, your primary focus is checking for long-range SAM tracks or incoming enemy interceptors. If you are operating a helicopter without scout intel, avoid taking the most direct line to an enemy base. Experienced opponents place ambush assets along obvious ingress routes to catch impatient pilots. 5. Disrupt Production Zones: Target industrial factories in enemy production zones. At the start of a campaign, these areas are undefended unless opposing players manually purchase and deploy security units. Every destroyed factory requires several hours of real-time repairs. If the enemy leaves them broken, the automatic logistical flow of weapons, pods, and fuel to their connected Logistics HUB warehouses drops significantly. Destroying all production assets completely halts the generation of new equipment, forcing the enemy to rely solely on whatever remaining supplies and airframes are left in local warehouses. 6. Avoid Careless Attrition: Flying blindly into active enemy air defenses yields quick deaths. Furthermore, if you are shot down by a player or an asset purchased by the enemy team, you hand them a 30-point reward, allowing them to fund even more defenses. 7. Progress from Small to Large Targets: Only after you have mastered attacking and capturing minor outposts should you move on to Road FOBs and major Air Bases. Learn the engagement envelopes of specific air defense systems to counter them with correct tactics and weapon loadouts. 8. The Survival Workflow (SEAD/DEAD): Eliminate enemy air defenses systematically based on threat range and danger level. First, neutralize long-range SAM radars using anti-radiation missiles (SEAD). Next, remain at a safe altitude and utilize GBU precision-guided bombs to destroy medium-range SAM launchers (DEAD). Before descending into low-to-medium altitude blocks, utilize a JTAC drone to scan and tag threats. The drone automatically flags targets starting with the highest threat priority, saving you from searching visually and overlooking a deadly asset. 9. The Cleanup Phase: Once a base’s integrated air defense network is completely down, close in to destroy remaining generic ground units and logistical structures. This phase is generally safe, though certain hardened bunkers feature high damage resistance. Practice using optimal fuse settings and heavy ordnance in the mission editor to handle them efficiently. 10. Component Elimination: If you destroy a long-range SAM radar that is explicitly owned by an enemy player, make a concerted effort to wipe out its secondary launcher components as well. If components survive, the owner can repair the radar array at half price—destroying everything denies them this economic discount. 11. Target Early Warning Radars (EWR): When a ground-based EWR asset is exposed on the map, prioritize its destruction. Blinding the enemy's long-range radar track strips them of situational awareness in that sector and forces them to redirect resources to replace it. 12. Coordinate with Team Elements: Coordinate closely with your coalition teammates to focus your combined sorties onto a single base. Splitting your forces across multiple targets usually results in superficial damage; the bases will automatically repair over time, forcing your team to start over from scratch. 13. Logistics Win Wars: Never underestimate the impact of helicopter and transport aircraft logistics flights. Strategic supply runs often provide the coalition with a decisive edge. Use transport assets to deploy EWR radar networks, tactical SAM sites, and AAA rings in optimal choke points. Utilize Combined Arms to direct ground assault columns, initiate artillery barrages, and call in AI close air support (CAS). 14. Review and Adapt: The only path to mastery is perseverance, critical analysis, and tactical experimentation. Joining forces with veteran server regulars will accelerate your learning curve significantly. Always audit your Tacview files after a loss. Often, what you think killed you was merely a distraction from the actual threat you overlooked. |
Chat Commands
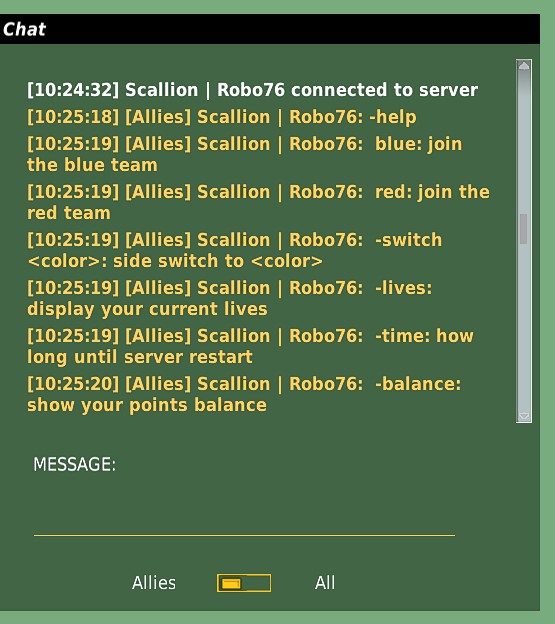
Game Chat Commands for Fowl Engine Mission commands start with a dash, for example: -help | |
blue | Join the blue team coalition. |
red | Join the red team coalition. |
-help | Lists all chat commands. |
-lives | Displays your current lives. |
-balance | Displays the number of points you currently have. |
-switch blue | Side switch to blue. Can be performed once per campaign. |
-switch red | Side switch to red. Can be performed once per campaign. |
-delete 1234 | Delete a group 1234 you deployed for a partial refund |
-transfer 100 playernick | Transfer 100 points to another player |
-transfer 200 objective:Sochi | Transfer 200 points to objective Sochi |
-action move 1234 w | Move a land or sea unit (unit ID) to waypoint "w". |
-action <name> <args> | Perform an action, -action help for a list of actions |
 | |
Game Chat Commands for DCS Server Bot Bot commands start with a dot, for example: .help | |
.linkme <token> | Link your user to Discord |
.help | The help command |
.timeleft | Displays how long until server reset. |
.911 <message> | Send an alert to admins (misuse will be punished!) |
.ack | Acknowledge a user message |
.atis <airport> | Display ATIS information |
Comm Cards
The radio frequencies are tailored specifically for the Caucasus map. To avoid interfering with "Flaming Cliffs" modules, they do not overlap with any active airport ATC frequencies. Additionally, all airframes included in the mission have these frequencies pre-configured into their radio presets, and all relevant AI flight units will transmit on these channels. While these settings are optimized to support as many aircraft within each coalition as possible, some exceptions exist—particularly for Western airframes operated by the Red coalition. Just like in real life, Eastern and Western air forces utilize distinct frequency bands based on their hardware limitations. Consequently, requests for frequency modifications will not be accepted. Changing a frequency to accommodate a single aircraft would break communication compatibility for the rest of the coalition's fleet. |
BLUE Team Radio Frequencies | ||||
240 | MHz | AM | Main / GCI | |
243 | MHz | AM | Guard | |
Enfield | 231 | MHz | AM | Drone small Enfield |
Pontiac | 232 | MHz | AM | Drone small Pontiac |
Ford | 233 | MHz | AM | Drone small Ford |
241 | MHz | AM | Tactical 1 | |
242 | MHz | AM | Tactical 2 | |
244 | MHz | AM | Tactical 3 | |
Wizard | 246 | MHz | AM | AWACS E-2C |
Overlord | 275 | MHz | AM | AWACS E-3A |
Texaco | 276 | MHz | AM | Tanker boom KC-135 |
Shell | 277 | MHz | AM | Tanker basket KC-135MPRS |
TACAN 78X,ICLS 15 | 278 | MHz | AM | Carrier CV-59 Forrestal |
TACAN 79X, ICLS 16 | 279 | MHz | AM | Carrier LHA-1 Tarawa |
60 | MHz | FM | Helicopters Main | |
61 | MHz | FM | Helicopters Tactical 1 | |
62 | MHz | FM | Helicopters Tactical 2 | |
63 | MHz | FM | Helicopters Tactical 3 | |
RED Team Radio Frequencies | ||||
120 | MHz | AM | Main / GCI | |
121.5 | MHz | AM | Guard | |
Uzi | 146 | MHz | AM | Drone small Uzi |
Chevy | 147 | MHz | AM | Drone small Chevy |
Springfield | 148 | MHz | AM | Drone small Springfield |
142 | MHz | AM | Tactical 1 | |
143 | MHz | AM | Tactical 2 | |
144 | MHz | AM | Tactical 3 | |
Focus | 145 | MHz | AM | AWACS A-50 |
Arco | 230 | MHz | AM | Tanker IL-78M |
TACAN 14X, ICLS 22 | 225 | MHz | AM | Carrier V-2 Veinticinco de Mayo |
226 | MHz | AM | Carrier 1143.5 Admiral Kuznecow | |
30 | MHz | FM | Helicopters Main | |
31 | MHz | FM | Helicopters Tactical 1 | |
32 | MHz | FM | Helicopters Tactical 2 | |
33 | MHz | FM | Helicopters Tactical 3 | |
Weapons Balance
Caucasus1985 SARH
TOP Fox 1 AAM R-27 R vs. AIM-7 F TOP Fox 2 AAM R-73 vs. AIM-9M (limited numbers in stock) M-2000 C & Matra Super available to both coalitions
2 pcs AGM-84D Harpoon & Rb15 & C802AK 2 pcs AGM-88 & LD-10 2 pcs R-73 vs. 2 pcs AIM-9M 2 pcs GBU-24 Paveway III
AAM Fox 3 (including Phoenix) JSOW & GPS bombs & GB-6 & Bk90 AGM-84E & CM802AKG CBU-97 SFW CBU-105 SFW+WCMD & GB-6-SFW CBU-103 (WCMD) Hydra 70 APKWS & BRM-1 90mm AGM-84E SLAM & CM802AKG AN/APG-78 & AGM-114L KG-600 SPJ & ALQ-184 & ALQ-184 Long AN/ASQ-228 ATFLIR Targeting Pod & AN/AAQ-33 Advanced Targeting Pod ADM-141A TALD CCD Imp ASM AGM-65H & K JHMCS GBU-43/B MOAB LAU-138 With Chaff |
📌 NOTE: For a more detailed analysis of campaign balance, please visit the Discord channel 🛫 DCS SERVER 1 ➤➤➤ #├📋server1-briefing |
Coalitions Air Forces
Below is the breakdown of how the airframes are divided. The number of available lives for each type is listed in parentheses. | ||
Blue | lives type | Red |
F-14A (Early) |
|
F-14A (Export) |
AV-8B, A-10A, A-10C A-10C II, F-16C OH-58D, AH-64D | Attack [4] | AJS-37, JF-17 Su-25, Su-25 Mi-24P, Ka-50, Ka-50_3 |
F-4E-45MC, F-5E-3 F-15C, M-2000C | Intercept [4] | MiG-21 Bis, MiG-29A Mirage-F1EE, M-2000C |
MB-339A, C-101CC | Recon [5] | L-39ZA, C-101CC |
SA342M/L, CH-47F UH-1H, C-130J-30 | Logistics [5] | Mi-8MT, C-130J-30 |
controllable ground units | Combined Arms [4] | controllable ground units |
Lives
Each aircraft is assigned a category such as standard, ground attack, interceptor, recon, logistics and combined arms. Once slotted, one life is deducted from the selected airframe category. This life can only be returned once you land at a friendly base. If you do not return this life a 6 hour timer will begin, at the end of the 6 hour timer your lives will be restored for the specific category. You can use the chat command -lives in chat to get info on when your lives will restore. |
 |
⚠️ After landing at a base, wait for the confirmation message stating that you can safely unslot. This will appear shortly after you come to a complete stop on the ground. If you unslot earlier, you will lose your current airframe life! |
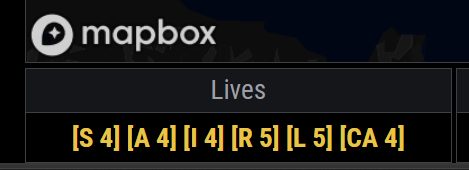 | [S 4] Standard 4 [A 4] Attack 4 [I 4] Intercept 4 [R 5] Recon 5 [L 5] Logistics 4 |
chat command -lives |
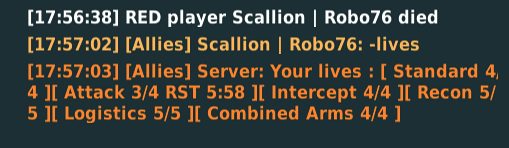 |
📌 NOTE: Respawn timers are tracked individually per pilot and per life type, rather than on a global scale. Each life-type cooldown runs independently and begins the exact moment a life of that specific category is expended. If you are airborne when the server restarts, your current life will not be deducted. |
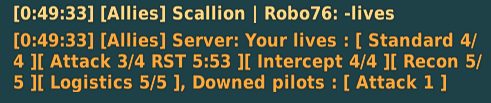
COMING SOON: This feature is unavailable in the current Beta and will be added in a future updates. At the end of the list are the downed pilots of the player currently active in the campaign. On the F10 map, they are marked with a green icon and a label showing the player's name and life class. If a downed pilot is rescued by a CSAR mission and transported back to a coalition base, that life is returned to the player and points are awarded. When a life class is reset, all of that player's downed pilots from the same class are removed from the map. |
 |
_____________________________________________________________________ |
Points System
Every action costs points. Luckily, you can earn more by doing almost anything—from destroying ground and air targets to capturing bases and hauling supplies. Type -balance in Allied chat to check your current stash. If multiple players take down a target, the point reward is split evenly among them. |
Points 300 250 120 100 80 70 60 50 40 35 30 25 20 15 10 5 5 | Profits new player join carrier kill medium boat capture HUB AWACS kill capture Airbase small boat ammunition depot capture FOB EWR kill air kill command center kill factory kill delivery of supplies command post kill LR SAM bonus kill ground kill |
📌 NOTE: Notifications during the mission will show the points you earn for destroying targets. However, these kill points only hit your account once you land at a coalition airbase. Points for any other actions are credited instantly. | |
Objective Points Players can contribute directly to a shared pool of points tied to specific objectives. To donate, simply use the chat command. Once pooled, these points become a public resource for the entire coalition. When deploying a crate, the system can split the cost between your personal balance and the points stored at the objective where the crate was originally loaded. Contributing to the pool Use the transfer command with the objective: prefix: (for example) -transfer 200 objective:Sochi This moves 200 of your personal points into Sochi's reserve. How costs are split at unpack time Every crate records the objective it was loaded from (the origin objective). When you unpack, the engine verifies that your personal balance plus the origin objective's pool together cover the deployable cost. Your own points are always spent first; the objective pool covers whatever remains. Rules to keep in mind • No range limit. Crates can be flown anywhere on the map — the origin objective still contributes its points at unpack, regardless of distance. • Proximity restrictions. Some servers block unpacking within a set distance of friendly objectives. This is a placement rule only and has no bearing on how the cost is calculated. • Logistics repairs. On servers that charge for repairs, objective points are drawn against repair costs using the same logic.
|
Balancing System
Periodic award We know that when players stack one team, people who want to play for the opposing side often avoid joining because fighting against a massive numbers advantage feels pointless. We choose not to force players away from their preferred faction—balance is handled through points, not join limits. That is why the "Periodic Award Balancing" system was introduced in Fowl Engine 2.0. This system rewards players for joining the weaker team. Thanks to passive award balancing, you will have more resources available for defense, so you don't have to wait for more teammates to log on. The amount of balancing points is recalculated at the start of each interval based on the current number of online players. • If your team has fewer players online, you will earn more points per tick. • If your team has more players online, you still receive the standard amount—you are not penalized. • If the opposing team has no players online, no one receives passive points for that interval (no fight, no free income). • When receiving a boosted payout, the system message will display: "periodic award (balancing)". 📌 NOTE: The periodic award is only given to players who are currently airborne (flying an aircraft or helicopter)!
20 Red vs 10 Blue online Red players get the standard 5. Blue players get 10 (balancing boost). 20 Red vs 5 Blue online Red players get the standard 5. Blue players get 20 (balancing boost). 2 Red vs 10 Blue online Red players get 25 (balancing boost). Blue players get the standard 5. 1 Red vs 20 Blue online The lone Red player gets 100 (balancing boost). Blue players get the standard 5. 0 Red vs 10 Blue online Blue players receive nothing for that tick—no system message, no passive points. 5 Red vs 0 Blue online Red players receive nothing for that tick—no system message, no passive points. |
Campaign Map
Layout Caucasus 1985-SARH |
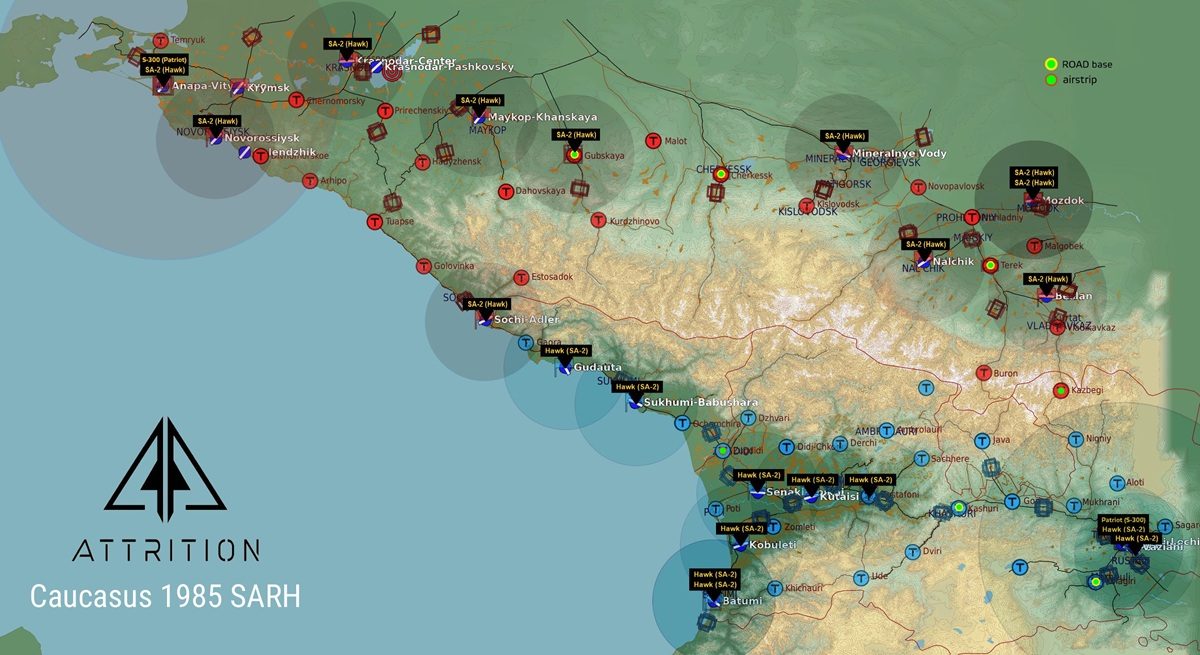 |
📌 NOTE: Only strategic, long-range SAM sites tied to mission objectives are marked on the map. Player-deployed SAMs may be active in other areas! |
Objectives
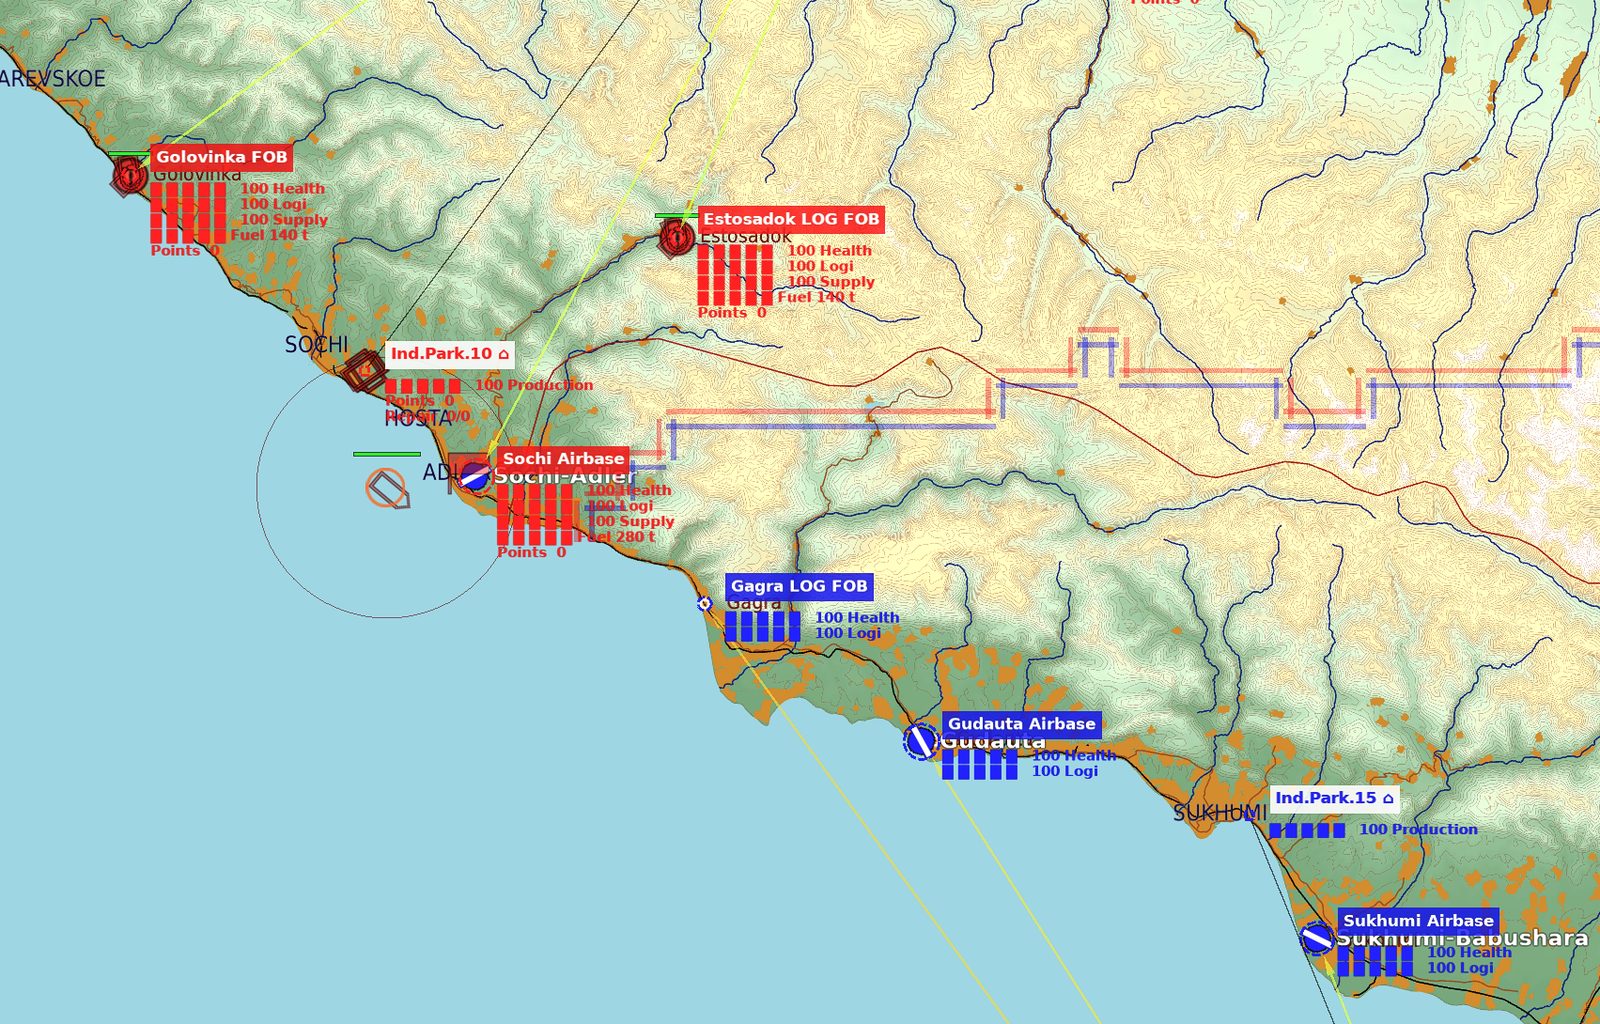
Objectives are military bases that must be destroyed or captured to win the campaign. Land bases come in several types based on size and purpose. Naval objectives are aircraft carriers that have military units that can neutralize and occupy enemy targets. Although aircraft carriers cannot be occupied (they cannot change ownership), they must also be destroyed to win the campaign. All of the listed objectives are distinguished on the F10 map by a colored background in their name. (There are also industrial zones on the map, which have their names written with a white background because they are not objectives (they cannot change ownership / cannot be occupied), and do not need to be destroyed to win the campaign.)
LOG FOB Light & medium attack helicopters Light AAA defenses
Light & medium attack helicopters Heavy attack helicopters Road FOB Light & medium attack helicopters Heavy attack helicopters Logistics Hub (on Road FOB) Logistics Hub (on Airbase)
|
 | ░ ░ ░ ░ ░ (0%) |
An example showing the objectives of the red and blue coalitions. Industrial zones are not objectives, which is why their names have a white background. |
 |
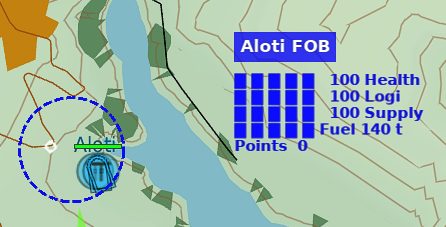
📌 NOTE: Just as you cannot view the contents of enemy warehouses, enemy objectives will not display their Supply and Fuel values in their data. Similarly, their Points and Repair indicators are not visible. All information is only available for objectives of the player's coalition. |
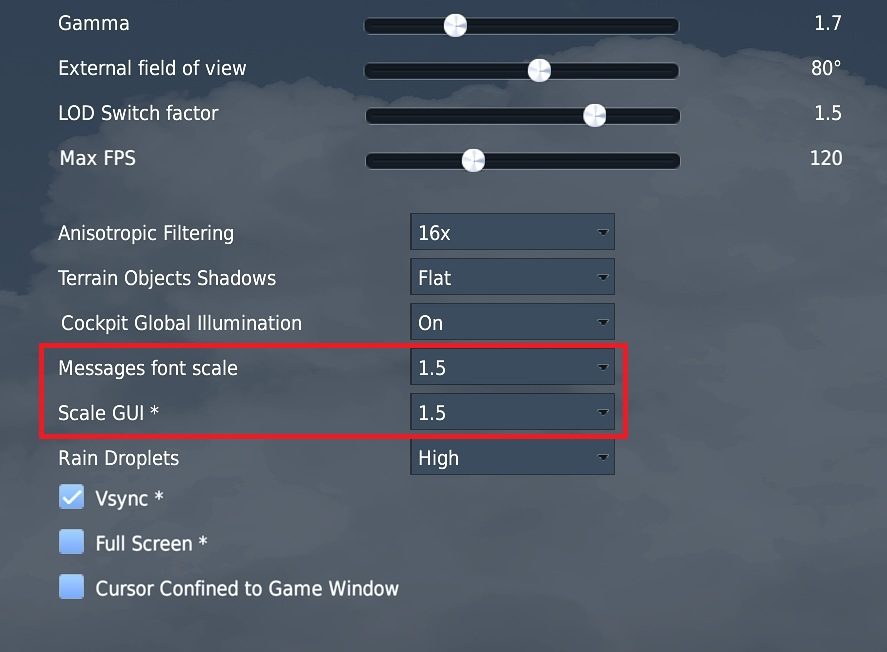
💡 TIP: If you are using a higher screen resolution and the infobar labels are small and unreadable, you can try setting a higher GUI magnification in DCS. However, experiment with the magnification value, as it may affect the overall smoothness of 3D rendering / FPS (some combinations of screen resolutions vs. GUI multipliers do not give "integer results" and are therefore more computationally demanding). |
 |
Threaten Mechanic
With the ability to place units on bases comes the need to limit when you can place them, so that units don't essentially appear underneath enemies. This feature also allows players to have a visual in-game indication of which bases are under threat. The threat mechanic addresses this issue by adding a state in which bases are "threatened", represented on the F10 map by a yellow circle around the base. The threat state is activated if there is an enemy ground unit within 10 km of the center of the base, or an enemy aircraft or helicopter is approaching the base. The faster enemy air units approach the base, the sooner/further the threat state is activated. A base is no longer under threat if there are no enemy units within range for a campaign-defined period of time (5 minutes). | |
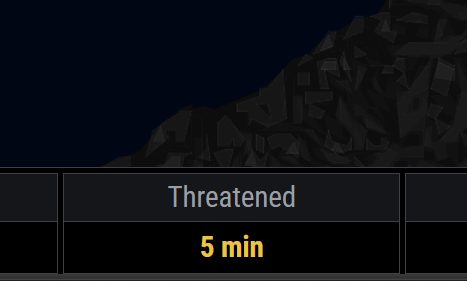 | You can find the threat timeout value in the Live campaign map in the bottom bar. |
While the base is threatened: • No air AI units can be sent from it (they will take off from the nearest suitable neighboring base that is not in threaten) • Deployable units from crates can be unpacked outside the yellow circle, i.e. at least 10 km from the center of the base • Deployable infantry units cannot be dropped in the base perimeter (dashed blue / red circle), but must be unloaded outside it • The base cannot receive new supplies from the automatic supply into its warehouse! In this state, supplies can only be delivered to the base by player transport flights. • If the base is undergoing repairs of logistical or defensive units, this happens very slowly. Even when the base is threatened, players can slot into planes and helicopters on it. However, it is important to remember that they can be destroyed by enemy action while still on the ground and life is deducted even without taking off! Due to the negative effects of threatened, it is necessary to detect and destroy enemy units in the yellow circle around the base as soon as possible! To do this, it is necessary to place your own JTAC units in suitable places around the base so that they have a view not obscured by the terrain. Or send a drone to the base, which from above will better detect ground units hidden behind the terrain. Similarly, a Recon plane piloted by the player can be used. |
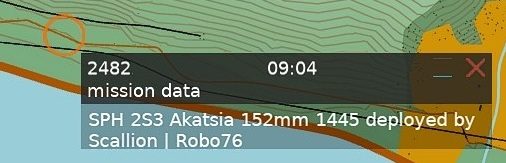
Example: Even if there are no enemy aircraft or helicopters in the air, a single enemy coalition unit (such as this SPH 2S3 Akatsia 152 mm) will keep Senaki Airbase under threat. |
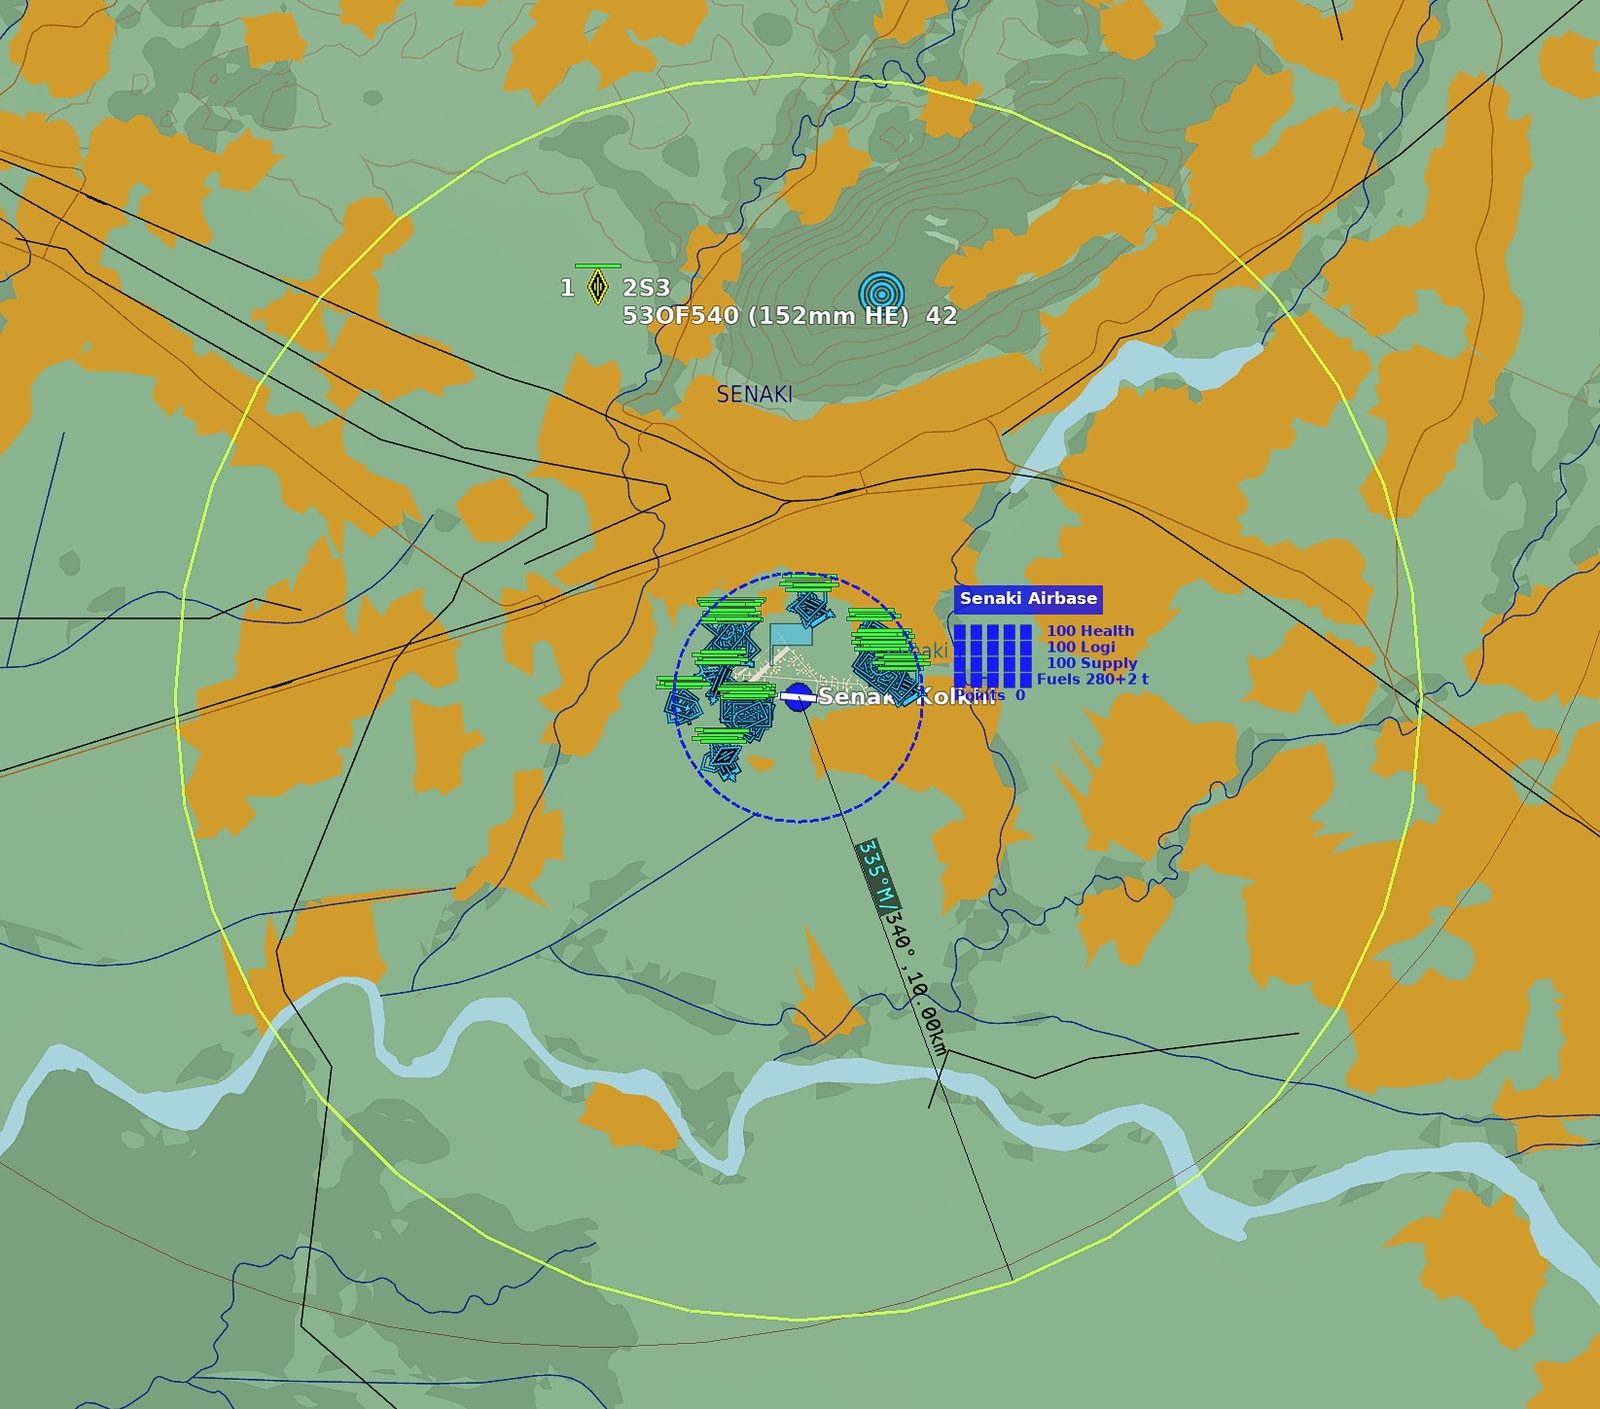 |
📌 NOTE: If the blue team does not have a JTAC unit or drone nearby, they will not see the enemy unit on the F10 map! |
Capture Mechanics
To capture an airbase, its logistics bar must first be completely depleted. Once zeroed out, a white circle will appear around the base to signal it is ready for capture. Note that other health bars do not need to be at zero to trigger this. With logistics down, a logistics helicopter can drop infantry at the objective to secure the base. Alternatively, infantry can be deployed or repositioned prior to neutralization, triggering an instant, automatic capture the moment the base goes neutral. Only Standard, Anti-Tank, and Mortar infantry squads are capable of capturing a neutralized base. The logistics health bar directly reflects the status of specific logistics units and static objectives located at each site. To prevent exploit loops, no points are awarded if a coalition simply re-captures a base they previously allowed the enemy to neutralize; point rewards are strictly tied to a genuine change in base ownership. Deployable dynamic FARPs, Industrial Production Zones, and Naval dynamic FARPs (such as aircraft carriers and flight-deck-equipped vessels) cannot be captured—they can only be destroyed. Upon capturing an airbase, any weapons and fuel common to both coalitions are transferred directly to the new owner's warehouse as war trophies, keeping their current quantities intact. Coalition-specific items, however, will only seed in small quantities. The remaining inventory will gradually replenish via automated logistics, provided the airbase is not actively under threat, until reaching 100% warehouse capacity. Players can accelerate this resupply process by manually hauling weapons and equipment using the dynamic cargo system. Doing so also allows players to overstock the warehouse beyond its standard capacity limits. 📌 NOTE: If players deploy infantry within the base perimeter prior to neutralization but the base is not captured immediately after going neutral, it indicates that enemy infantry is still present in equal numbers, blocking the capture. The base will then be awarded to whichever coalition secures infantry numerical superiority within the perimeter. | |
Domestic bases | Captured bases |
LOG FOB 1 x basic logistic group | LOG FOB 1 x small logistic group |
FOB 1 x medium logistic group | FOB 1 x basic logistic group |
ROAD FOB 1 x basic logistic group | ROAD FOB 1 x small logistic group |
Airbase 1 x basic logistic group 1 x Command Center | Airbase 1 x small logistic group 1 x Command Center |
HUB ROAD FOB 1 x medium logistic group 1 x strong logistic group 1 x Ammunition depot | HUB ROAD FOB 1 x basic logistic group 1 x medium logistic group 1 x Ammunition depot |
HUB on Airbase 1 x medium logistic group 1 x strong logistic group 1 x Command Center 1 x Ammunition depot | HUB on Airbase 1 x basic logistic group 1 x medium logistic group 1 x Command Center 1 x Ammunition depot |
final HUB on Airbase 1 x medium logistic group 1 x strong logistic group 1 x Command Center | final HUB on Airbase 1 x basic logistic group 1 x medium logistic group 1 x Command Center |
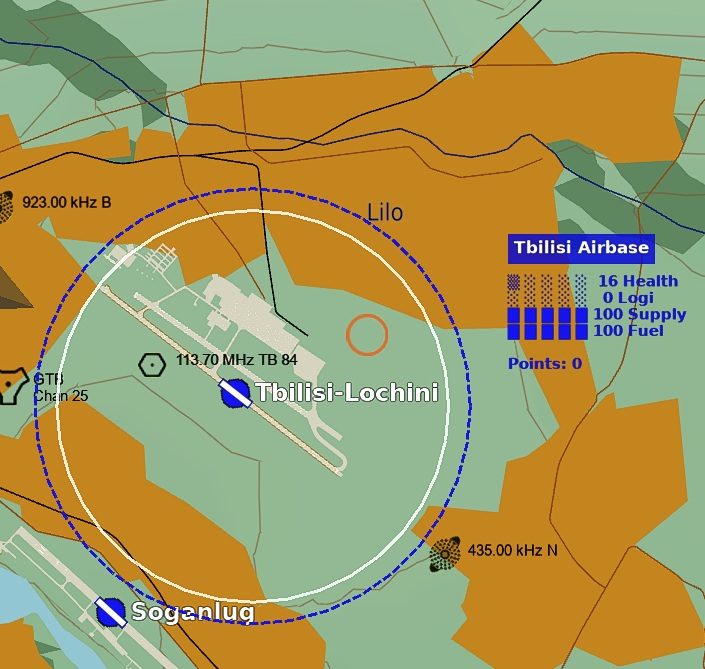 | In this example Tbilisi has 0 Logi health and is capturable. Notice the white inner circle which confirms the base as capturable. |
| Example of a capturable base. Also note that Health is 16, which means that the conquerable base can have defensive units. |
 | Message that will appear when a base is able to be captured. |
📌 NOTE: Defending units do not prevent a base from being captured (but they will attack enemy logistics). The first troop drop will essentially be a logistics company and is the same as dropping a repair crate. | |
Repairs
Repairs to objects and units occur either automatically if there are Logistics Units at the base, or through the activity of players who transport and unpack repair crates. All repairs cost points.
|
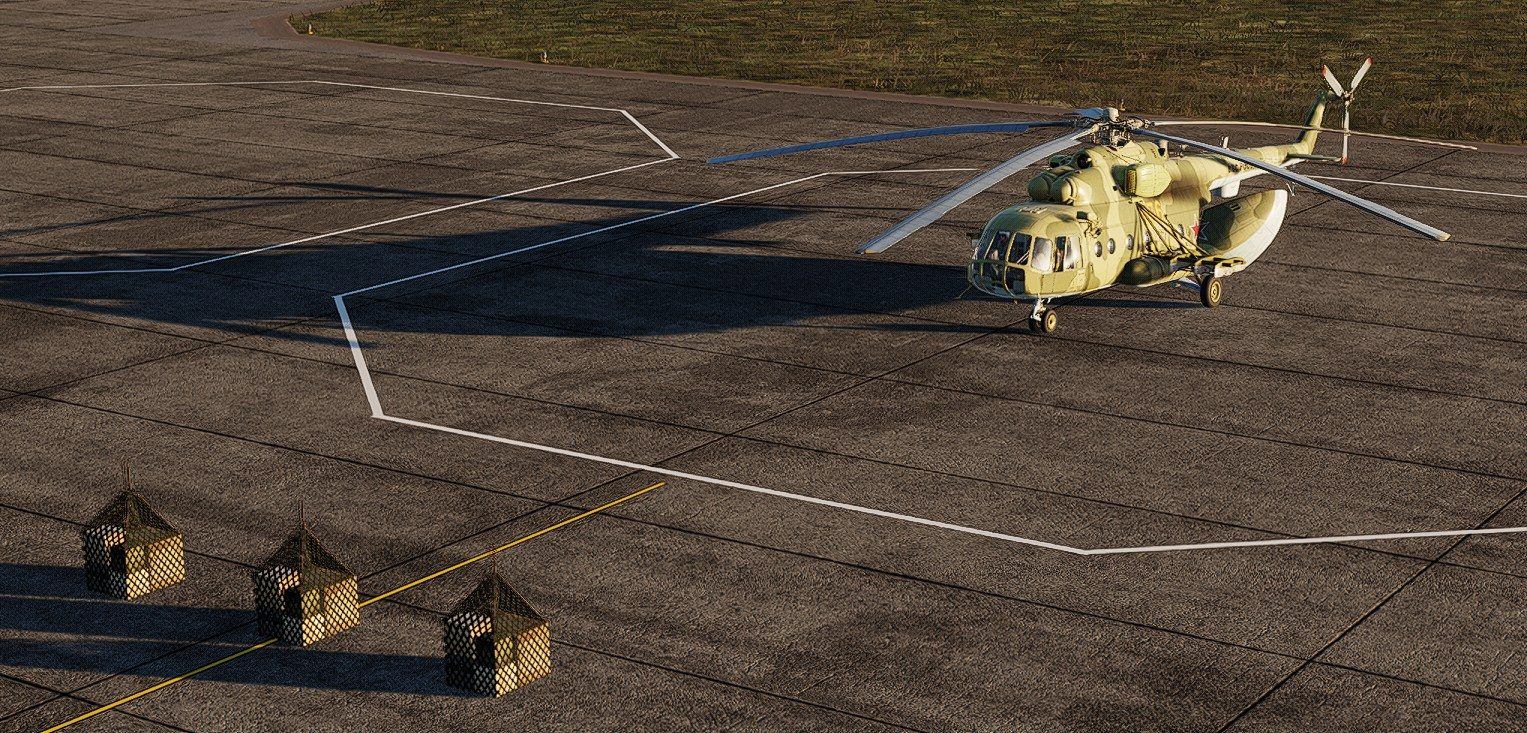 |
Logi |
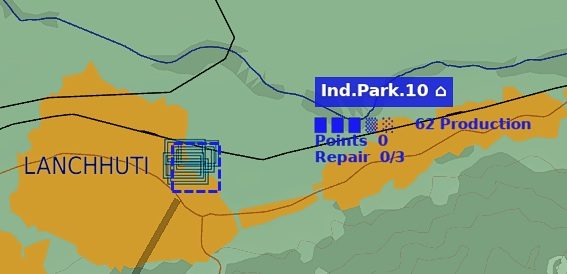 | example of a damaged production zone: Repair 0/3 0 = number of repair crates unpacked (no repair in progress) 3 = number of repair crates needed to repair to 100% production |
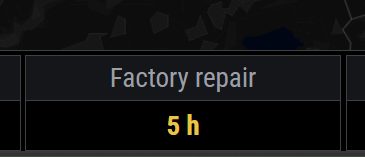 | 1 repair crate repairs 1 production building in 5 hours |
If the pilot transports and unpacks 3 repair crates in this damaged production zone, it will be completely repaired in 15 hours (and the supply of supplies to the connected HUB will increase proportionally). |
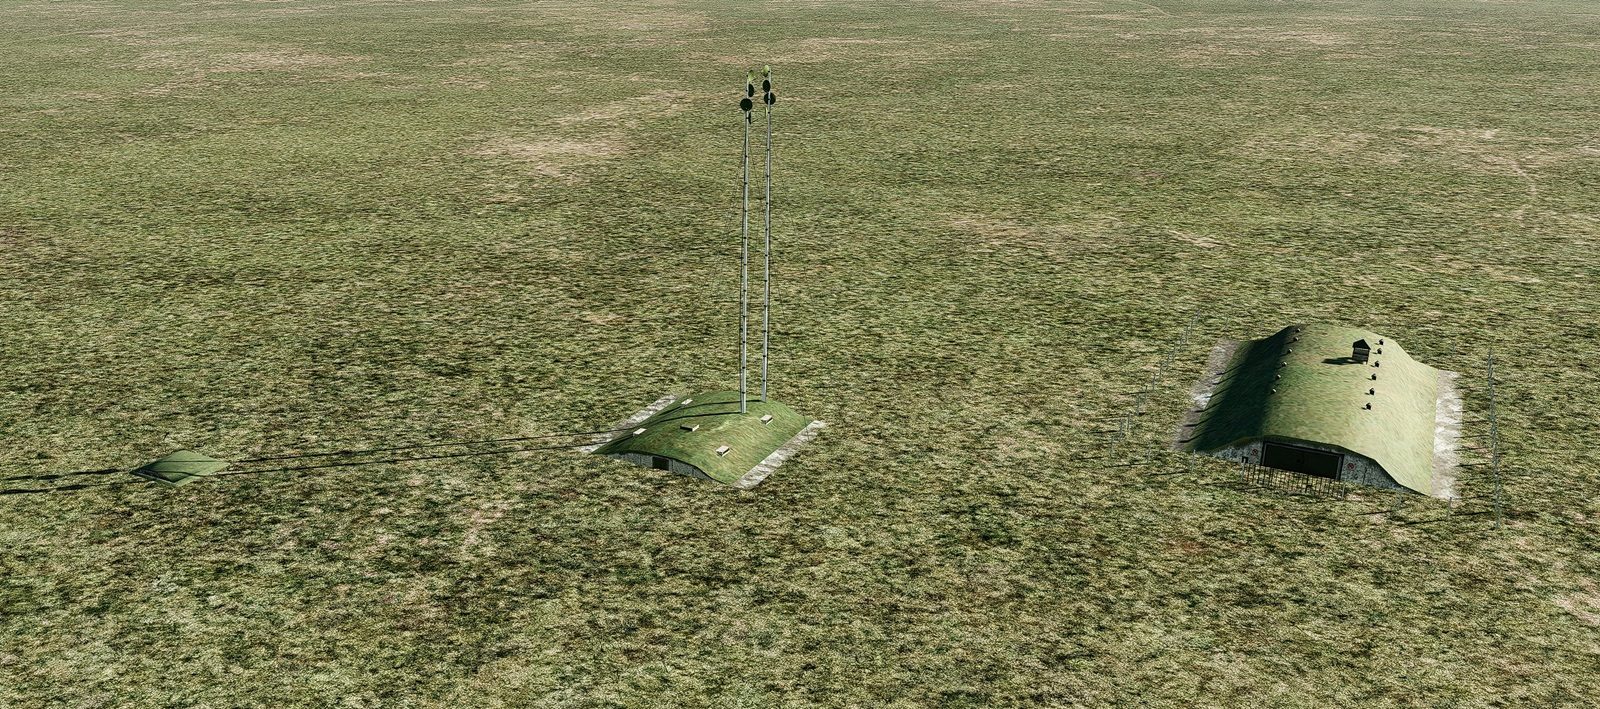
Statics Logistics objects Command Post → Command Center → Ammunition depot When a static object is destroyed on the base, a new item will appear on the map under the base information: Repair x/y x = number of repair crate(s) and therefore the number of objects being repaired y = number of destroyed static objects and therefore the number of repair crate(s) needed for repair For example, on the map under the HUB information it will be written: Repair 0/2 0 indicates that no repair crate has been unpacked yet and repairs have therefore not started. 2 indicates that the Command Center and Ammunition Depot are destroyed on the HUB base. |
FARP Command Post Command Center Ammunition depot |
 |
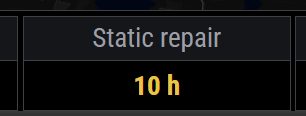
📌 NOTE: Before players can begin repairing these static objects, the other classic logistics groups on the base must first be repaired. For example, the airbase has 85% Logi, Repair 0/1. If the player unpacks the 1st repair crate, they will complete the repair of the classic logistics groups and the Logi will show 97%. If the player unpacks the 2nd repair crate, Repair 1/1 will be displayed, starting the repair of the destroyed Command Center, which will be completed in 10 hours. |
 |
Warehouses
Dynamic Engine utilizes the warehouse system for all its aspects. At the start of each campaign every base starts with a templatized number of resources. This means every base starts with a set number of aircraft, munitions, and fuel. It is important to keep in mind that the number of airframes available at a base is independent of lives. You can access the warehouse menu via the F10 map by clicking on an airfield then clicking resources. For FOBs and Logistics Hubs you can click on the FARP pad and then click the small arrow in the bottom right to view the warehouse. The base depot only contains weapons and equipment that require airframes that are stationed at the base to operate. If the coalition needs airframes, weapons, or equipment at the base that are not there, players must transport them there themselves. Weapons, fuel and airframes transported in this way will remain in the warehouse even in excess of the limit, as players transport them there using dynamic cargo. When restarting the round, the contents of each warehouse are saved, and when starting a new round they are loaded back, so what is not consumed does not disappear anywhere. The item number limits are only used for the automatic logistics system - if the number of tracked items is below this limit, they are replenished during the logistics tick. 📌 NOTE: If AI air groups are spawned at a base, their airframe pieces are also deducted from the base's inventory, including their fuel, weapons, and equipment. If AI groups perform Rtb (refueling and rearming), everything is also deducted from the base's inventory. |
Airfield Example 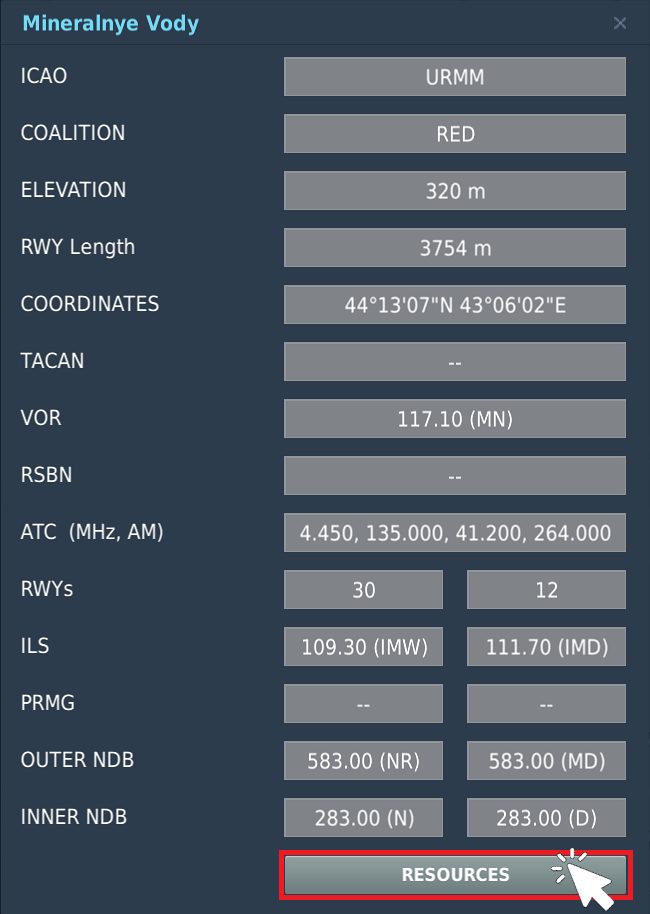 FOB / Logistical Hub 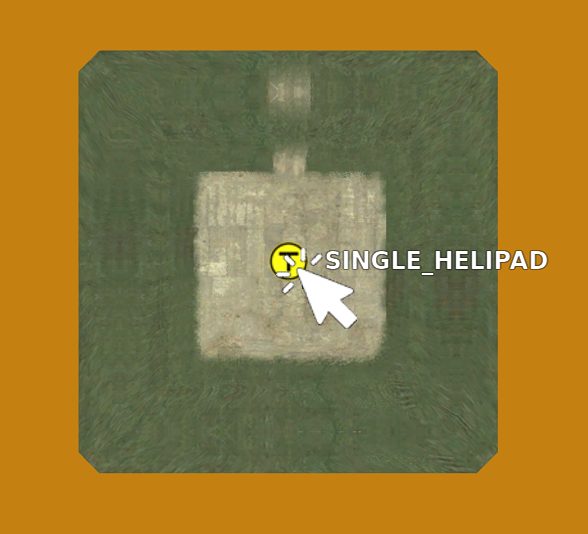 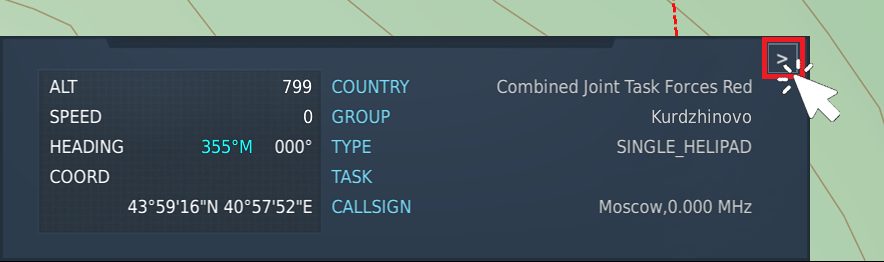 Warehouse 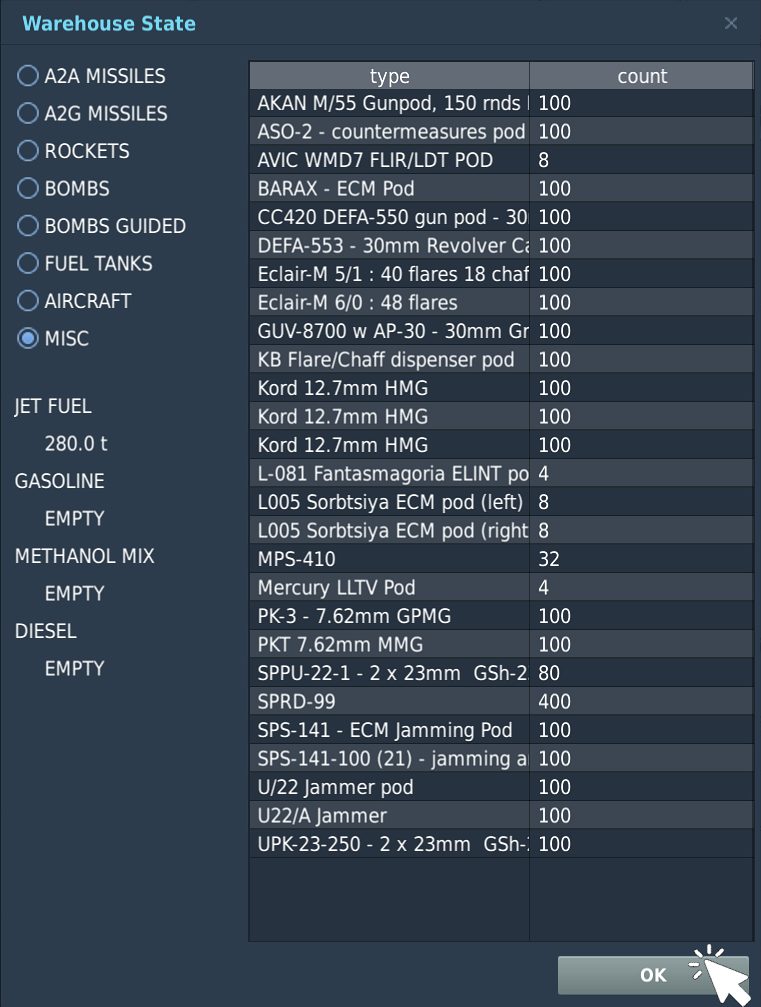 |
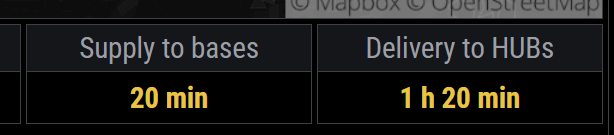
Inventory items are divided into: a) Tracked items including airframes. These are advanced and therefore the most used items, which have smaller inventory quantities. When running low, these items are refilled at home HUBs during the "Delivery to HUBs" phase, scaling with the HUB's current Production value. Next, they are routed to linked allied bases during the standard "Supply to bases" intervals. b) Other Weapons and Equipment (we're talking "dumb" weapons here, rarely used unless the stockpile runs out of better options) are also distributed from HUBs to surrounding bases via automated logistics. However, these items are not included in the standard "Delivery to HUBs" intervals. Instead, if a home HUB's stock of these items hits zero, they will replenish at the start of the next round. The replenishment amount is determined by that specific HUB's Production value. |
📌 NOTE: If the base or HUB is not in danger, each logistics interval sends a logistics HUB to replenish a portion of the sub-limit monitored supplies and fuel. |
 |
⚠️ Logistics runs won't trigger immediately after you pull a single item or airframe from stock; a larger deficit is required to prompt a resupply. If you're waiting on specific items or airframes that just aren't shipping, you'll need to draw down other inventory first. This triggers the restock threshold and forces the logistics system to dispatch a new delivery. |
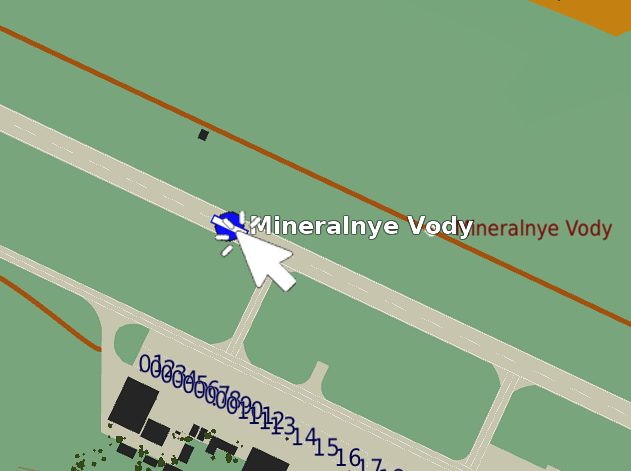
Logistics HUB
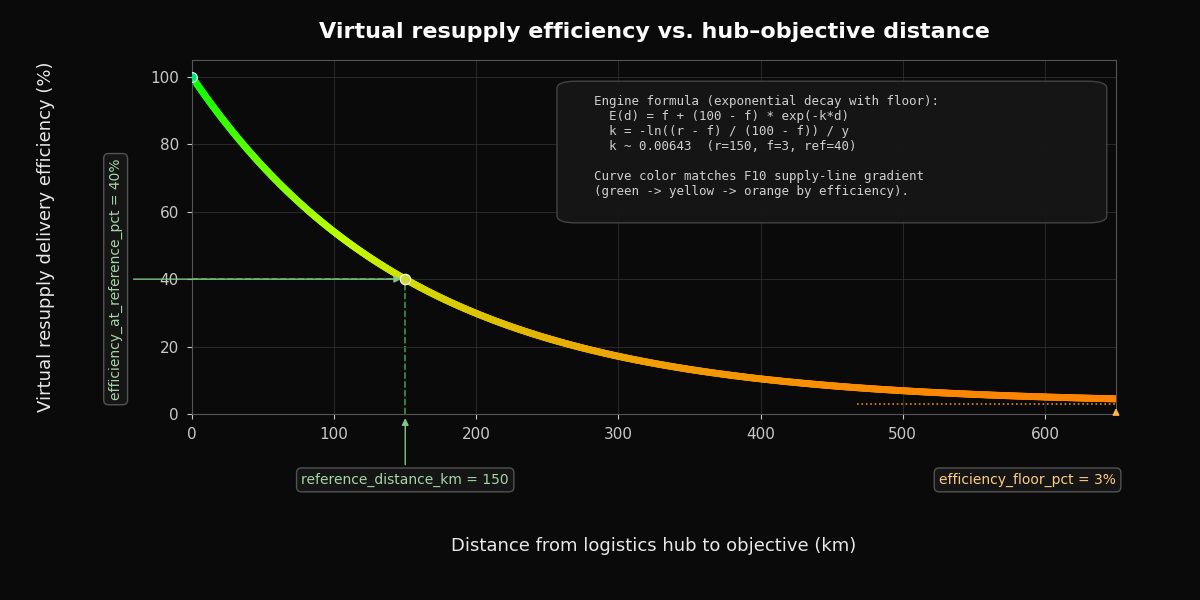
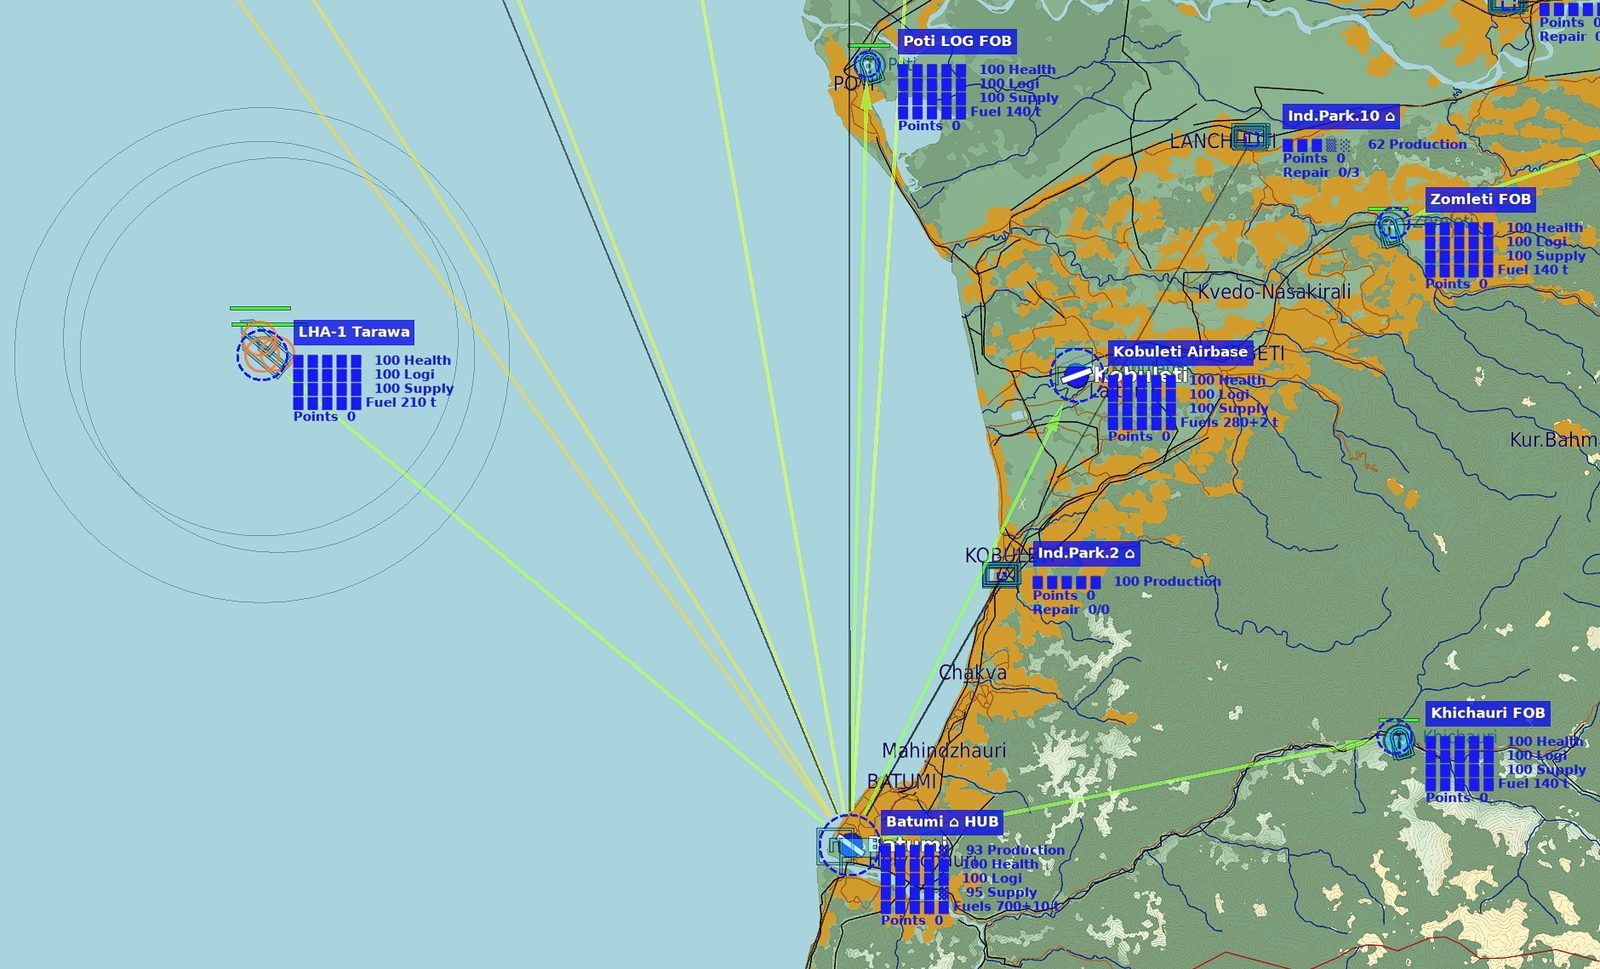
Logistics hubs collect fuel, ammunition and airframes from factories and distribute them to the coalition ground bases and naval depots they are closest to, at "Delivery to HUBs" intervals. The total volume of deliveries to HUBs depends on the status of the connected production zones, these connections are shown on the map as gray lines. Each time a connected production building is destroyed, its Production indicator for the industrial zone is reduced, and the production value of the HUB is also reduced. For example, if 50% of the connected production buildings are destroyed, the amount of supplies delivered to the relevant HUB will be reduced by 50%. Bases start with a certain number of resources and receive more from logistics hubs. Supply lines are created and calculated immediately after capture or loss and are graphically displayed on the map. The color of the supply lines (green - yellow - orange) indicates a gradual decrease in the volume of supplies delivered with increasing distance. When you capture a logistics hub or base, all shared equipment will be captured, while all other resources will be destroyed. The best example of a shared resource is fuel. Logistics hubs contain many times more resources than bases, so losing a logistics hub is very detrimental to the coalition's supplies as a whole. In the case where a HUB is occupied in the original territory of the enemy coalition, production zones (gray lines) cannot be attached to it, and this HUB receives supplies in "Supply to bases" intervals, and then distributes them to the nearest coalition bases. This means a weakened supply force for the coalition in the enemy territory of the map, and C-130 Hercules transport aircraft are needed to strengthen and speed up the supply delivery. If a base in the combat zone runs out of supplies, players can use the dynamic cargo system to transport additional supplies. When loading supplies, these supplies are deducted from the base's raw material warehouse. Pilots are rewarded with points for transporting supplies after they are unloaded, and their work allows the coalition to advance more quickly in the offensive. No base is cut off from supplies, even in the most remote area, but its automatic resupply is very slow. The amount of supply drop is determined by the mission settings, which can be found via the icon in the online campaign gadget. |
📌NOTE: New supplies are not delivered to the HUB if the HUB is in threat status. Likewise, supplies cannot leave it to surrounding bases. This is indicated by the disappearance of connecting logistics lines. |
decrease in supply deliveries according to the distance of bases from the HUB |
 |
the condition of production buildings and the size of supplies to HUBs that depend on it |
 |
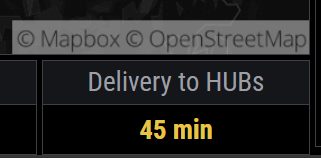
intervals of logistics deliveries to HUBs |
 |
supply lines from HUB |
 |
Occupied logistics HUBs |
If occupied, logistic HUBs in enemy territory have a special status. They are not connected to coalition production factories and do not receive new supplies from them (therefore, their Production value is not indicated in the tooltips). These HUBs in enemy home territory act as distribution transshipment points. They are connected to the nearest home HUB of their coalition, which is indicated on the map by a blue/red connecting line, and receive supplies at "Supply to bases" intervals and then forward them to the nearest connected warehouses of friendly bases at the same intervals. |
📌NOTE: The reduction of quantity according to the distance of HUBs is not applied to the supply of domestic HUBs → occupied HUBs. This is both an advantage and a disadvantage. Supplies are sent to the front occupied HUBs faster, but at the same time, domestic HUBs are emptied. If the enemy manages to occupy the occupied HUB back after the supplies have been moved, the coalition will lose a lot of stored supplies. |
Production Zones
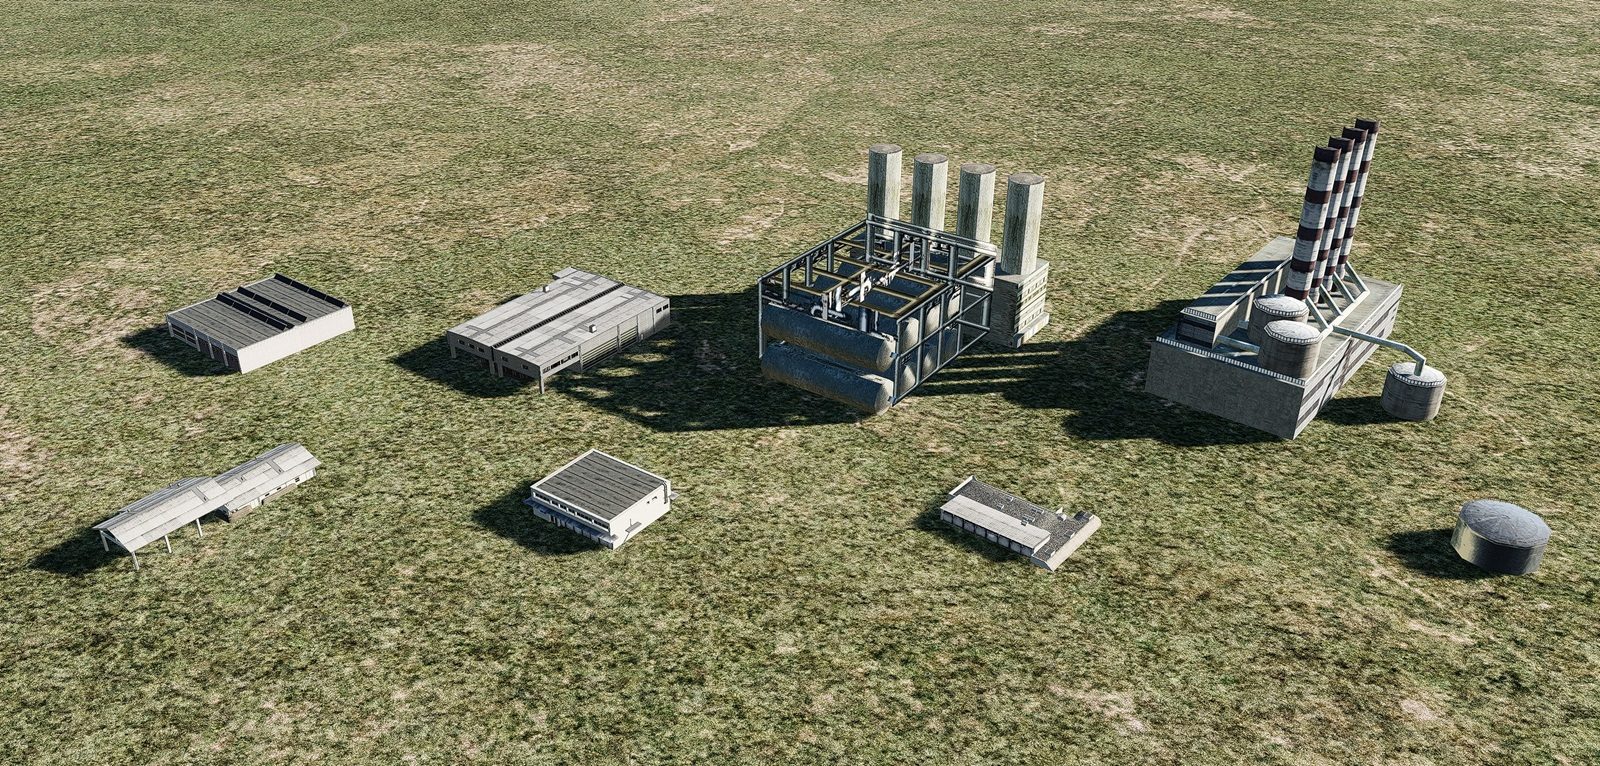
Production zones represent factories producing ammunition and fuel supplies for one of the coalitions. Their objects do not have to be destroyed for victory in the campaign - they are not objectives, and therefore the destruction of their buildings cannot bring the zone to a neutral state. Production zones have the same owner from the start to the end of the campaign, and it is desirable to destroy their buildings, thereby reducing the supply of supplies to enemy HUBs. When the "Production" indicator drops to 0%, the black line on the F10 map indicating the connection to the nearest HUB disappears. For the victory of the coalition, it is therefore important to protect your own production zones and damage the enemy ones as much as possible. There are no native defense units in production zones, as on other bases, and players must take care of defense by deploying suitable defense deployable units and possibly securing CAP. Likewise, there are no Logistic objects in production zones, so destroyed production buildings will not repair themselves. Players must provide repairs by transporting and unpacking Repair crates. The repair time of 1 production building lasts according to the "Repair factory" value set in the campaign, which increases the usefulness of completing missions with the goal of destroying these zones and also increases the need for their defense. No crates and infantry units can be spawned in production zones. Likewise, players cannot spawn in planes or helicopters there, but they can land in them and regain their life. Production zones, like bases, have the ability to store "Points". If a player tries to unpack a defensive unit from a crate for which they do not have enough points, the missing points will be deducted from the production zone's "Points". The total number of connected production objects in production zones to logistics HUBs is set to different amounts at the start of the campaign and these also change during the campaign if a HUB is occupied by the enemy and the production zones are connected to another closest HUB of their coalition. For example, if a production zone with 5 objects is connected to a HUB, each of these objects will provide 20% of the supply (100 % / 5) to this HUB. For example, if there are 15 connected production objects in total, each of them will provide 6.6% of the supply (100 % / 15). This means that the fewer production objects a HUB has connected, the faster it is possible to achieve an interruption of supply for this connected HUB by destroying these production objects. In order to disrupt the industrial zone and its supply of new supplies to the logistics HUB, ground units can be deployed near it, putting the zone in danger. This will break the black-gray supply line, and even if the industrial zone's objects are undamaged, it will not be possible to send supplies to the HUB as long as the danger persists. |
all 8 types of production objects |
 |
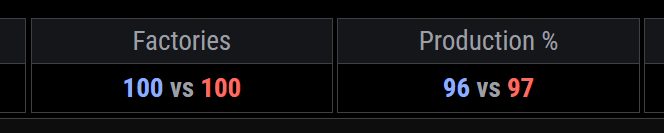
📌NOTE: Each coalition has a total of 100 factories/production facilities in all their industrial zones. This means that 1 production facility gives 1% Production. In the picture, Production is 96% vs 97%, which means that each coalition has one of their industrial zones in danger and therefore cannot participate in production. (The difference in % is due to the fact that industrial zones contain different numbers of facilities.) |
|
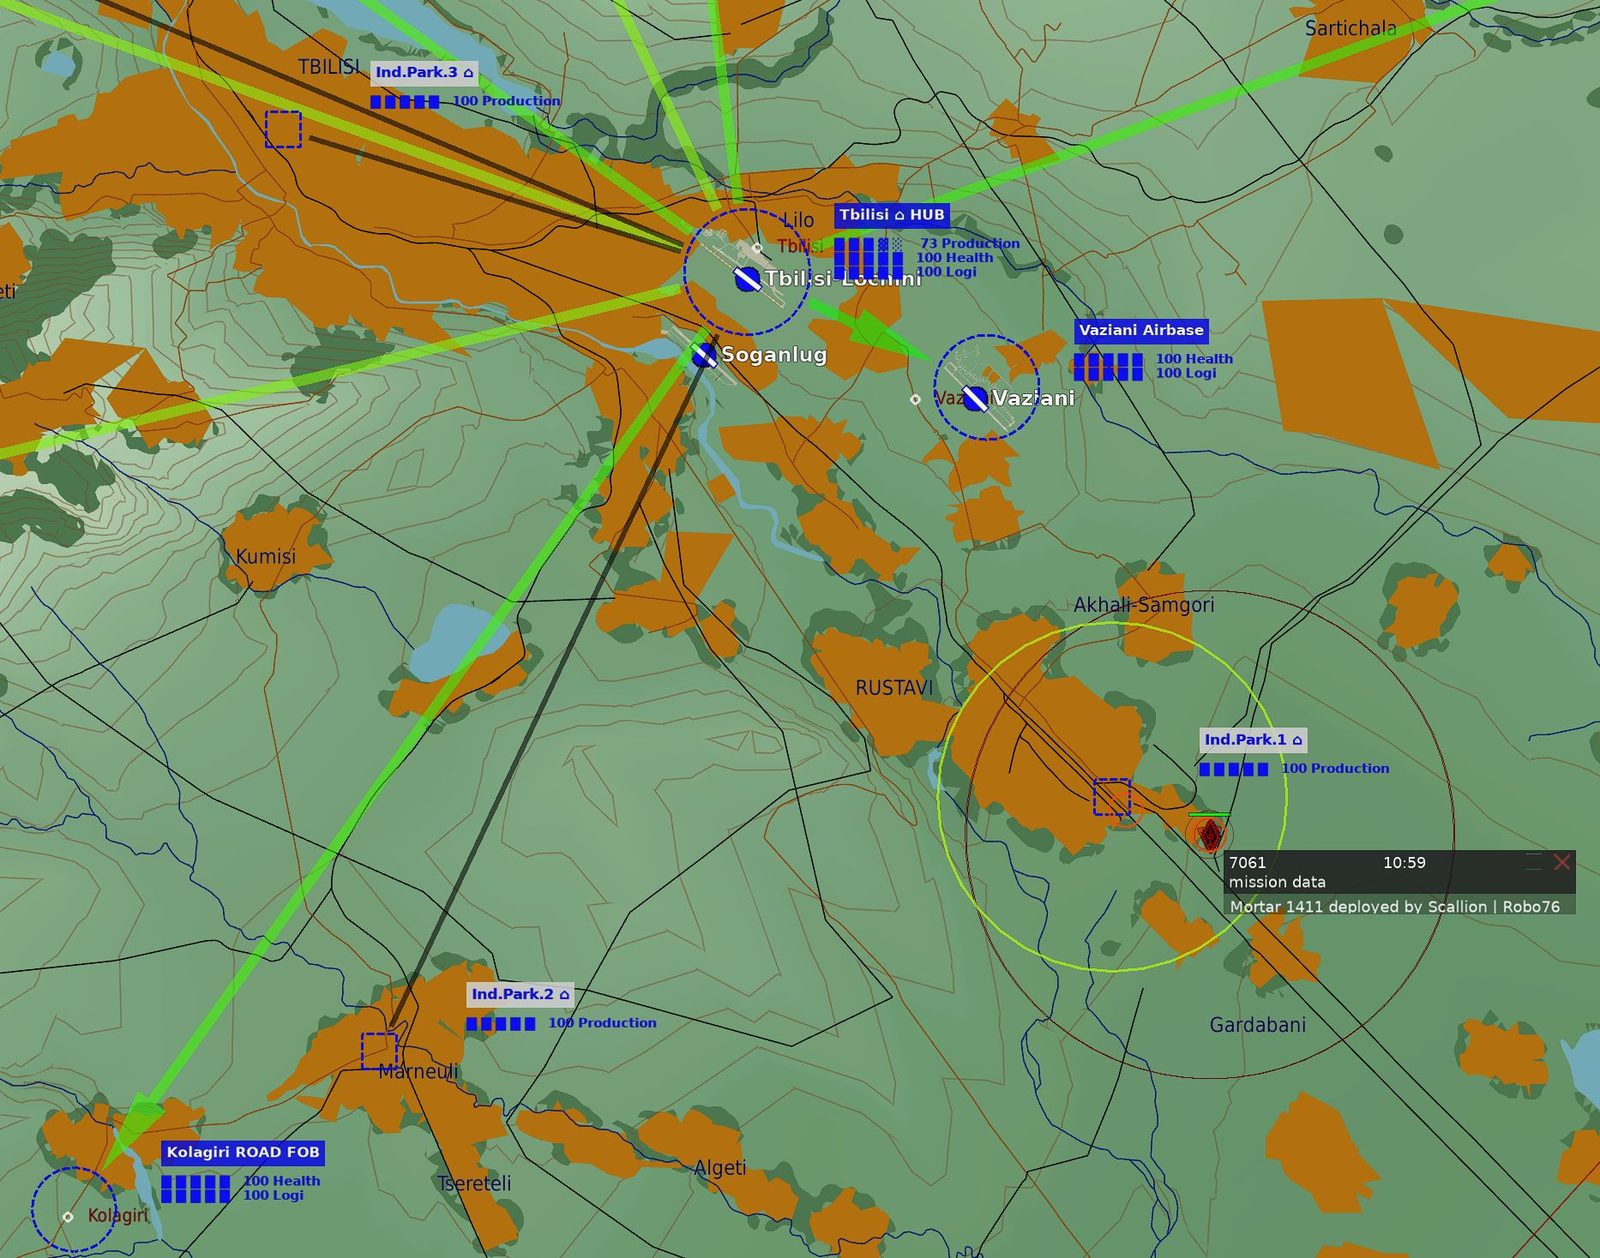
Even though the production zone has 100% and its objects are therefore undamaged, the threat state causes a disconnection from the HUB (the gray-black connecting line is not drawn), which has therefore dropped Production to 73% in Tbilisi HUB |
 |
example of a damaged production zone: 62 Production = 62 % zone objects works Points 0 = no extra charge for unpacking deployable crates (player must use his own points) Repair 0/3 0 = number of repair crates unpacked (no repair in progress) 3 = number of repair crates needed to repair to 100% production |
|
There are 3 destroyed objects in the production zone, repairing them will require unpacking 3 repair crates and a total time for the "Repair Shop" of 5 hours, the repair will take a total of 15 hours. |
Actions
Point-purchased actions are powerful and often require protection. To foster a culture of accountability, specific penalties are tied to the loss of certain point-action vehicles. We inherently want to reinforce an "actions have consequences" mindset regarding all coalition assets to prevent them from being spammed or needlessly wasted. If an asset features waypoint functionality, the following rules apply: The purchasing player retains full responsibility for the unit unless another player issues it a new waypoint command. Once a new waypoint command is given, ownership—and any associated penalties—transfers entirely to the player who issued the command, completely clearing the original owner of liability. Upon purchase, players secure an ownership lock on their AI air groups for a set duration (currently 24 hours), during which only they can issue commands. This 24-hour lock resets and extends every time the owner joins or leaves the server. However, if the owner fails to log in before the expiration window closes, the lock is permanently deactivated. Once a lock expires, those AI air units can be commanded by any allied player, who will then assume full responsibility and liability for their actions as outlined above.
Each player has a point action available. Just place a mark point and add some text to it and: method a) enter the Radio Menu F10 → Actions and select the desired action and then select the name of your mark point. You will receive a message to say if the action was successful or not. method b) enter the command in the allies chat: -action <command> <marktext> If the action fails, an error message is displayed with the reason for the failure. This is usually caused by a misspelled name for your point, or when there are two points with the same name on the map. Below are all available actions and commands (corresponding to those in the Radio Menu F10 → Actions menu)
| |
| |
Enter the command in the allies chat: | |
-action awacs w | 1x AWACS A-50 / 1x E-3 take off and fly to patrol the point marked "w" that you placed on the map. |
-action fighters w | 2x F-15C / 2x Su-27 take off and fly to patrol the point marked "w" that you placed on the map. |
-action interceptors w | 2x F-5E / 2x MiG-21 take off and fly to patrol the point marked "w" that you placed on the map. |
-action attack-planes w | 2x A-10A / 2x Su-25 take off and fly to patrol the point marked "w" that you placed on the map. |
-action sead w | 2x F-16 / 2x JF-17 take off and attack ground targets around the "w" mark. |
-action calcm w | 1x B-52H / 1x Tu-95 takes off and circles around the "w" mark, where it awaits the command to fire CALCMs at targets identified by the JTAC. |
-action attack-helicopters w | 2x AH-64 / 2x KA-50 take off and attack ground targets around the "w" mark. |
-action deploy-ewr w | The transport helicopter will deploy the EWR radar to the mark point you created called „w“. |
-action paratroops w | The transport helicopter will deploy a Standard troop to the point marked "w" that you created. |
-action paratroops-highalt w | Same as the previous one, but flies at a high altitude to better overcome hilly terrain. |
-action repair Gagra | The helicopter will deliver a repair crate to the designated base, which will repair the base's logistics. |
-action awacs-waypoint 1234 w | AWACS with ID number 1234 will begin moving to at the mark point you placed called „w“. |
-action fighters-waypoint 1234 w | Fighters with ID number 1234 will begin moving to at the mark point you placed called „w“. |
-action interceptors-waypoint 1234 w | Interceptors with ID number 1234 will begin moving to at the mark point you placed called „w“. |
-action attack-waypoint 1234 w | The attack-helicopters or planes with ID number 1234 will begin moving to at the mark point you placed called „w“. |
-action sead-waypoint 1234 w | The SEAD planes with ID number 1234 will begin moving to at the mark point you placed called „w“. |
-action calcm-waypoint 1234 w | The CALCM bomber with ID number 1234 will begin moving to at the mark point you placed called „w“. |
-action drone-waypoint 1234 w | The drone with ID number 1234 will begin moving to at the mark point you placed called „w“. |
-action status 1234 | air Ai group with ID number 1234 lists its fuel and weapons status |
only Red coalition actions | |
-action tanker w | Air refueler IL-78M take off and fly to patrol the point marked "w" that you placed on the map. |
-action drone-small-Uzi w | Drone Wing Loong take off and fly to patrol the point marked "w" that you placed on the map. |
-action drone-small-Chevy w | |
-action drone-small-Springfield w | |
only Blue coalition actions | |
-action awacs-small w | 1x AWACS E-2D will take off from the aircraft carrier and fly to patrol the point marked "w" that you placed on the map. |
-action tanker-boom w | Air refueler KC-135 take off and fly to patrol the point marked "w" that you placed on the map. |
-action tanker-basket w | Air refueler KC-135MPRS take off and fly to patrol the point marked "w" that you placed on the map. |
-action drone-small-Enfield w | Drone Predator take off and fly to patrol the point marked "w" that you placed on the map. |
-action drone-small-Pontiac w | |
-action drone-small-Ford w | |
Naval Ai groups actions | |
-action naval-corvette w | Spawn the corvette Grisha at the "w" mark. |
-action naval-frigate w | Spawn the frigate Rezky at the "w" mark. |
only Red coalition actions | |
-action naval-veinticinco w | Spawns the aircraft carrier V-2 Veinticinco de Mayo at the "w" mark. |
-action naval-kuznetsov w | Spawns the aircraft carrier 1143.5 Admiral Kuznecow at the "w" mark. |
only Blue coalition actions | |
-action naval-tarawa w | Spawns the aircraft carrier LHA-1 Tarawa at the "w" mark. |
-action naval-forrestal w | Spawns the aircraft carrier CV-59 Forrestal at the "w" mark. |
| |
Dynamic Cargo
System Purpose The Dynamic Cargo Delivery system in Fowl lets pilots move real warehouse stock—ordnance, equipment, and fuel—between friendly logistics objectives using Eagle Dynamics cargo containers. It is not the same as Fowl construction or repair crates, which exist only to build and repair base structures. Use dynamic cargo when you need to replenish a base’s warehouse because automated supply is too slow, or when a frontline FARP is critically short of materiel.
Land at a friendly airbase, hub, or FARP that has usable warehouse stock. Request the container through the normal DCS ground crew menu (F8 / Warehouse / Ground Crew). When the crate appears on the ramp, those items leave that airfield’s warehouse and Fowl tracks the crate as yours for delivery. Construction and logistics crates for deployables and repairs are ordered separately from Radio Menu F10 Other → Cargo → Crates; they are not the same as warehouse containers from F8. |
helicopters dynamic cargo menus |
Recon cargo-capable aircraft may still use those Radio Menu F10 Other → Cargo → Load and unload commands for Fowl crates.
At any time, Radio Menu F10 Other → Cargo → List Cargo shows what you are carrying: troop and crate slot usage, named crates aboard, dynamic cargo weight in the bay, and total weight. Use it to confirm the load before you leave. |
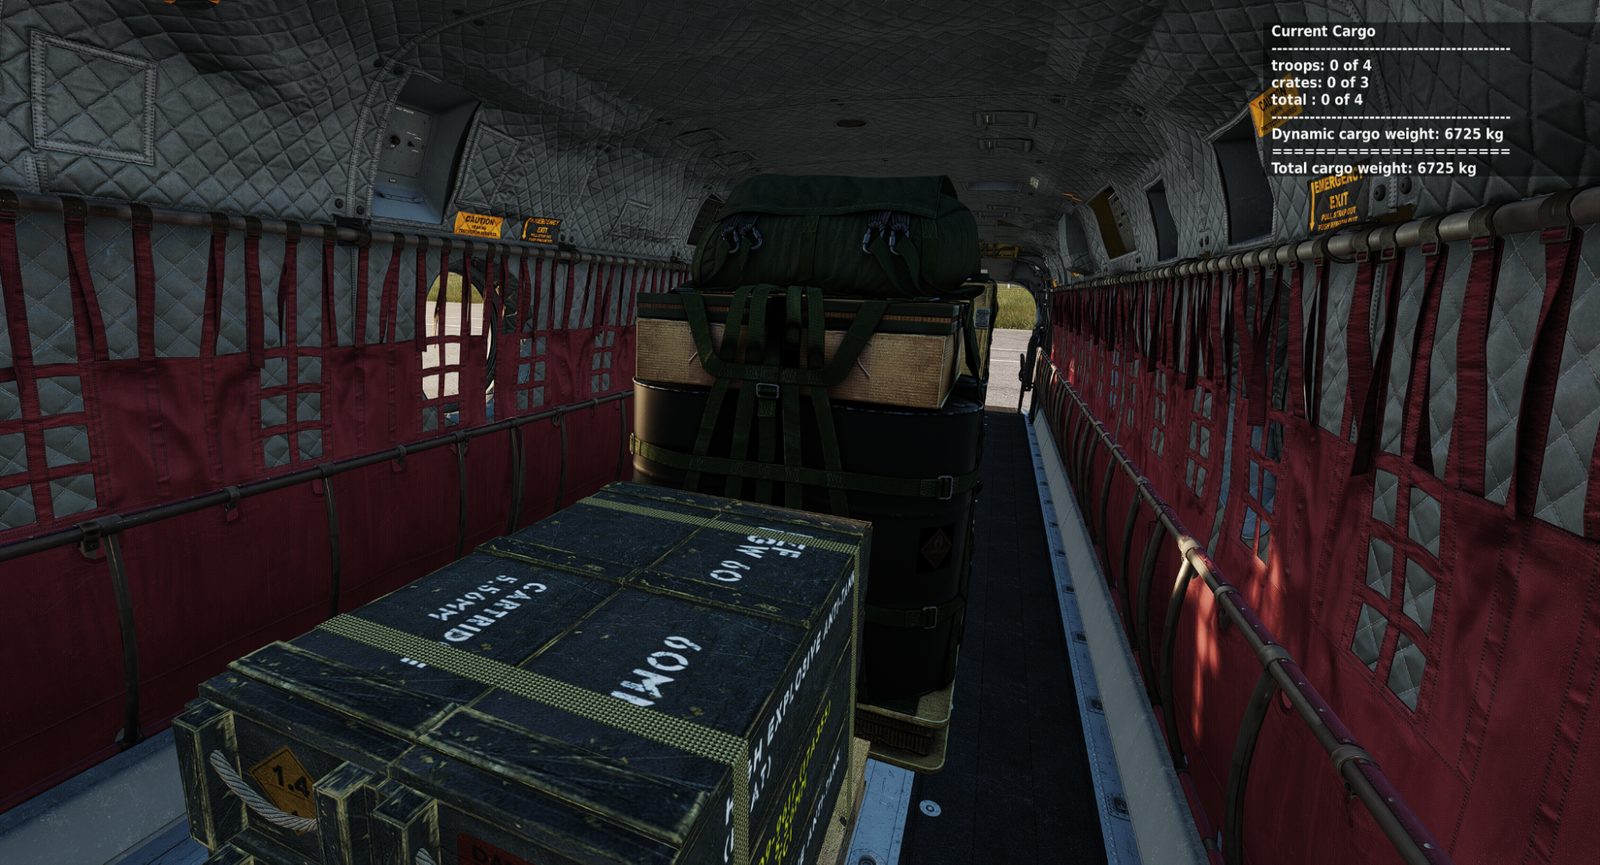 |
Fly to a different friendly logistics objective than the one where you checked the crate out. Production facilities do not count, and the destination must have working logistics. Unload or unhitch so the crate is on the ground near you, then use Radio Menu F10 Other → Cargo → Supplies → To stock. Fowl credits registered crates within about fifty meters into that objective’s warehouse, awards logistics points, and removes the containers. If DCS itself pulls a registered crate into the pad warehouse at a valid destination other than the origin, Fowl still counts that as a successful delivery when it can. |
Supply Drop |
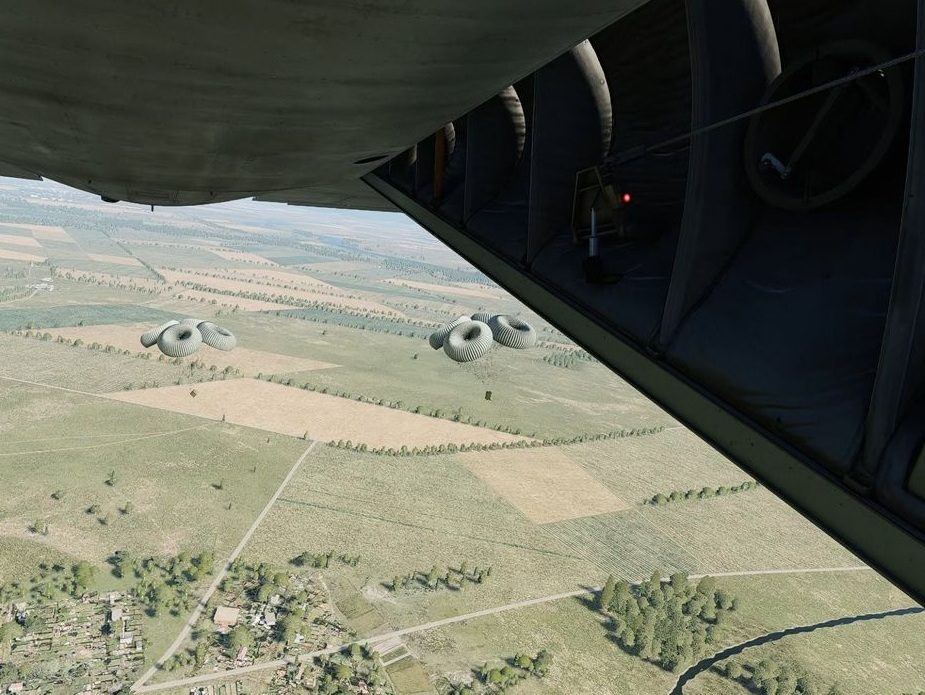
📌NOTE: If large containers dropped by a C-130 miss the base zone and land too far from the warehouse to be automatically added to the inventory, and the coalition lacks a helicopter capable of sling-loading heavy cargo (CH-47), the supplies from these crates are lost. Therefore, either choose smaller containers for the C-130 airdrop or land on the runway and unload the large containers. |
To stock will not work while crates are still in the aircraft—unload them first. It also will not stock crates back into the same objective where they were checked out; you must deliver somewhere else. Leaving a crate in the open field outside friendly logistics leaves it stranded: To stock does nothing there, and if the crate disappears with no valid destination, those supplies are gone from the network. Fowl does not automatically collect ground crates over time. Only To stock or a valid DCS absorb at a proper destination completes the run.
Successful cross-objective deliveries award logistics points by cargo weight, with a one-ton minimum for scoring so even lighter crates still pay. The pilot who checked the crate out of the warehouse earns the larger share; the pilot who stocks it at the destination—or who was last carrying it if DCS absorbs it—earns a smaller share. On current rates that is two points per ton for the checkout pilot and one for the deliverer, so a solo end-to-end run earns twenty points for a typical one-ton load. If supply crates are parachuted into a base area, a deliverer may still need to finish the job. If the DCS core does not absorb them into the warehouse on its own, players must land nearby, leave the crates on the ground within the objective, and use Radio Menu F10 Other → Cargo → Supplies → To stock so their contents are credited. Until a player does that—or DCS successfully absorbs them at a valid destination—the crates are not delivered.
Each side may only have a limited number of active dynamic cargo crates in play (100 on this campaign). If the team goes over the limit, the oldest registered crate is destroyed, so stock or clear unused containers instead of leaving them scattered. This campaign turns the feature on with dynamic_cargo_delivery (to_stock distance 50 m, 1+2 points per ton, max 100 pc dynamic cargo crates per side). |
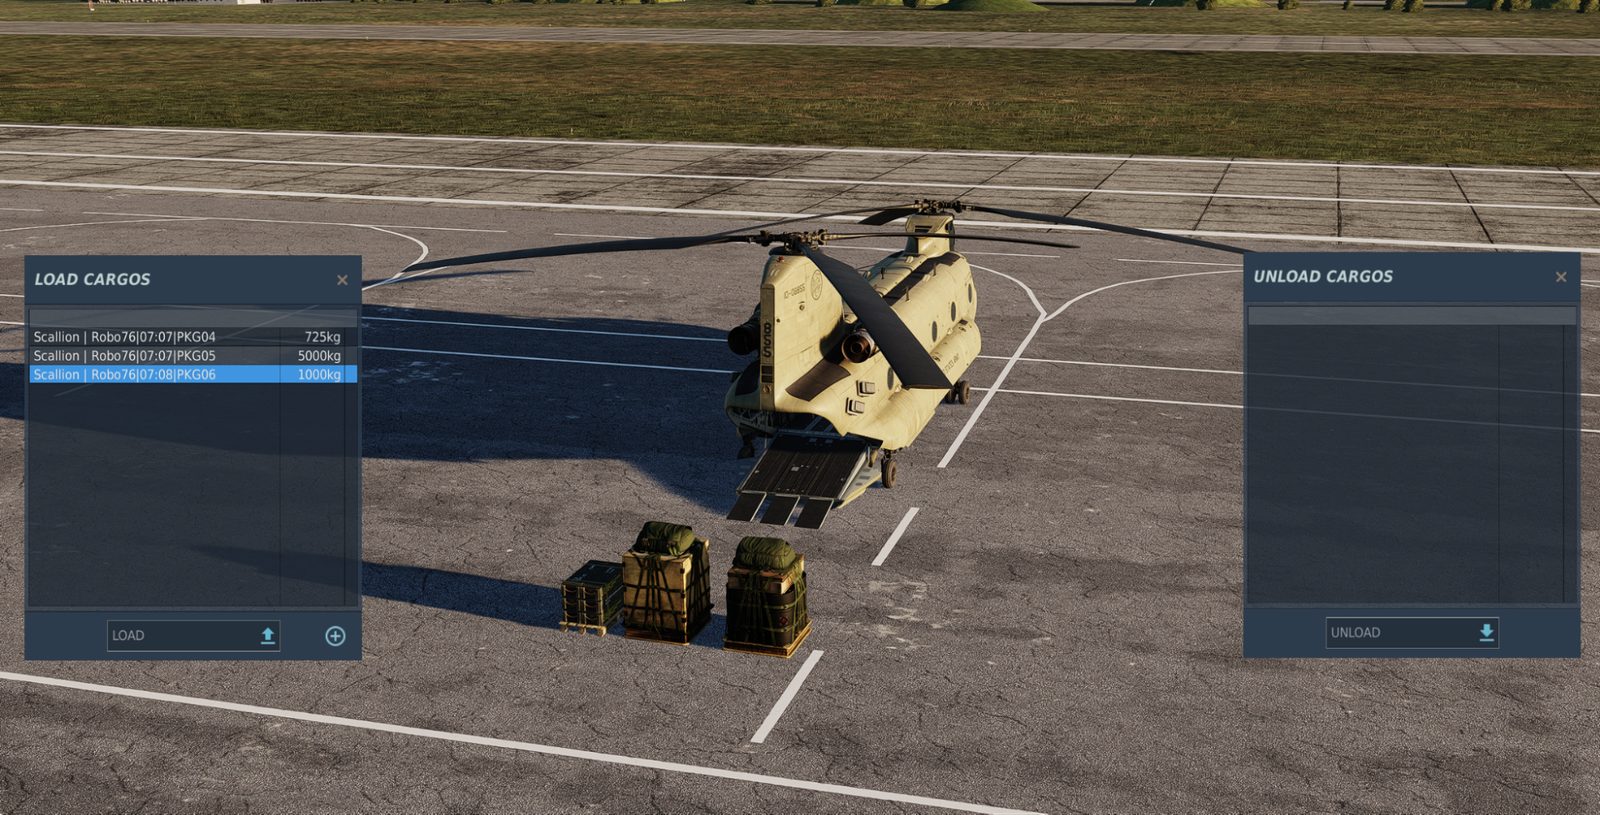
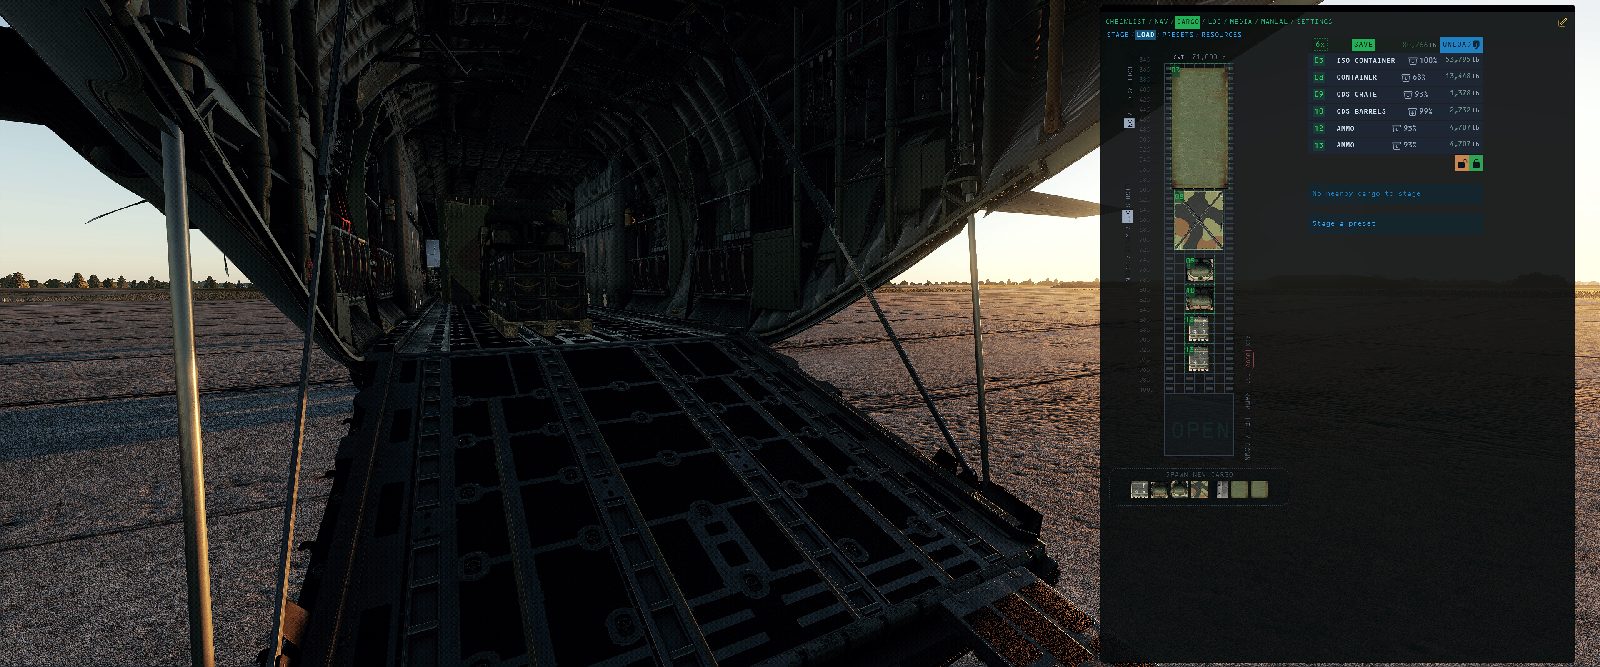
Deployables Units
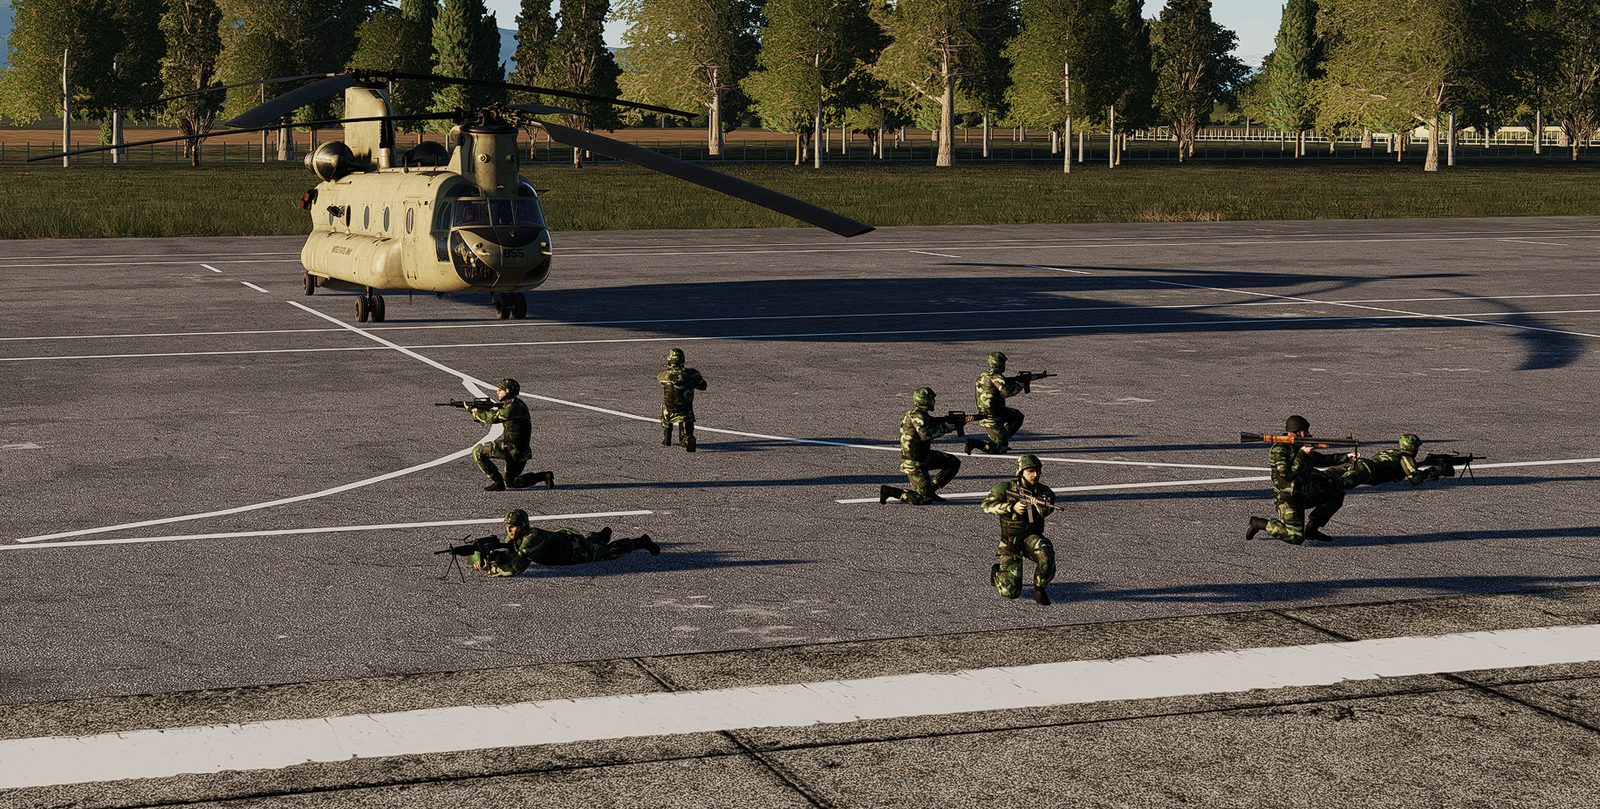
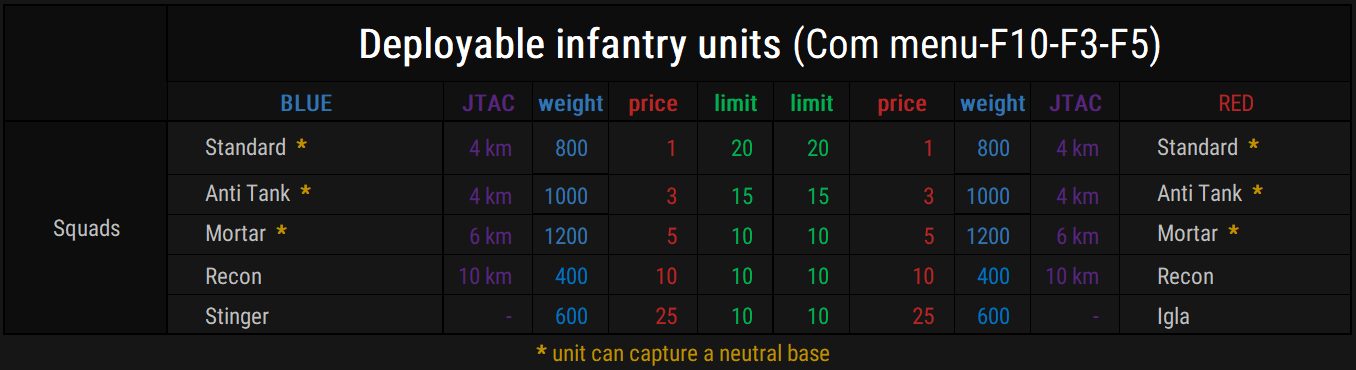
Troops - Squads Deployable infantry units can be dropped directly within a friendly base zone. However, if the base is under threat, infantry must be deployed outside of this zone (infantry is exempt from the 10 km minimum distance restriction from the base center, which is marked by a yellow threat circle). | |
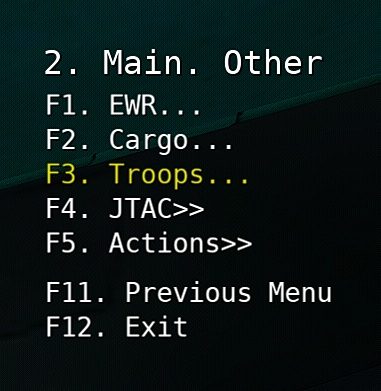 | F3 Troops |
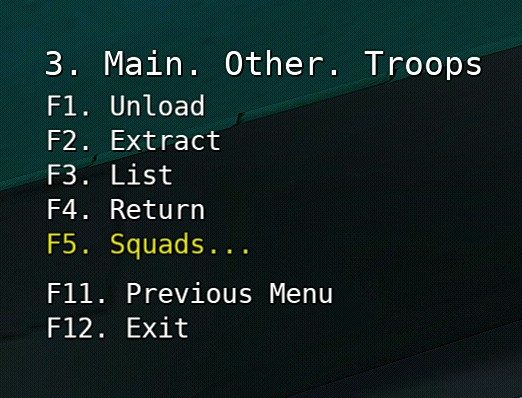 | F1 unloads troops F5 list of squads to load |
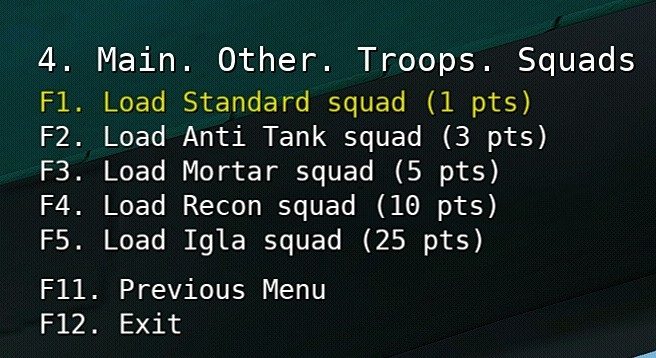 | F1 Standard squad |
 | |
 | |
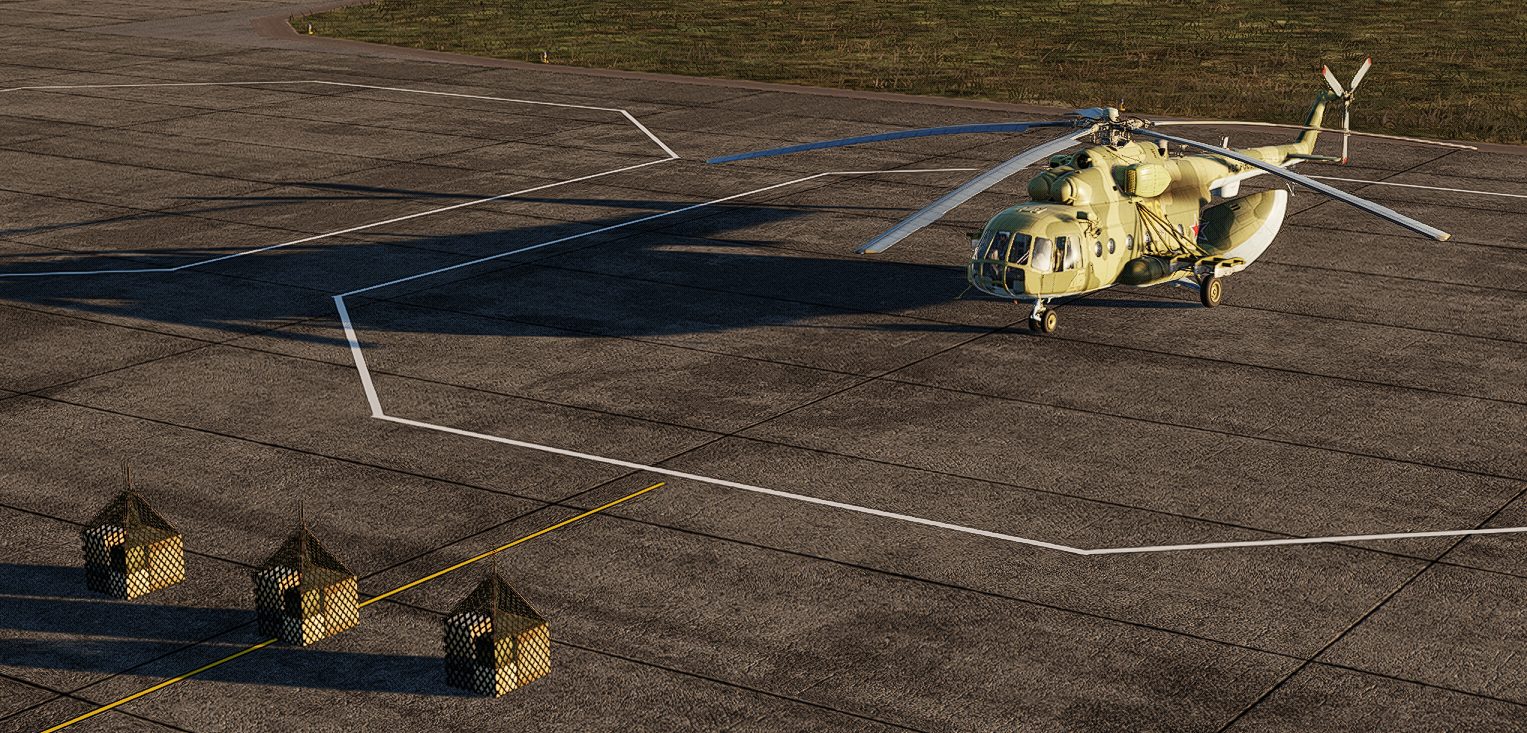
Cargo - Crates 1. Spawn your desired crate Radio Menu F10 Other → F2 Cargo → F7 Crates: it will spawn in front of your aircraft. 2. On the cargo menu, use F2 Load Crate to load the crate. 3. Once the crate is onboard you may fly it to where you would like to construct the deployable. 4. Then use F3 Unload Crate. You will need to be landed on the ground or in a hover to unload the crate. 5. After you have the required number of crates unloaded you can use F1 Unpack Nearby Crate(s) to build the deployable. | |
 | |
F2 Cargo | |
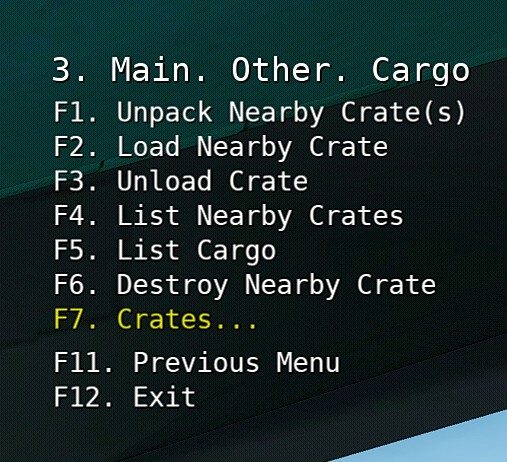 | F1 unpacks crate(s) F6 destroys crates F7 Crates … |
⚠️ If the menu does not have the options "Load Nearby Crate" and "Unload Crate", the dynamic cargo menu F8 must be used. | |
📌NOTE: When Unload Crates, the crate that was loaded last is unloaded first, followed by the second to last, and so on. | |
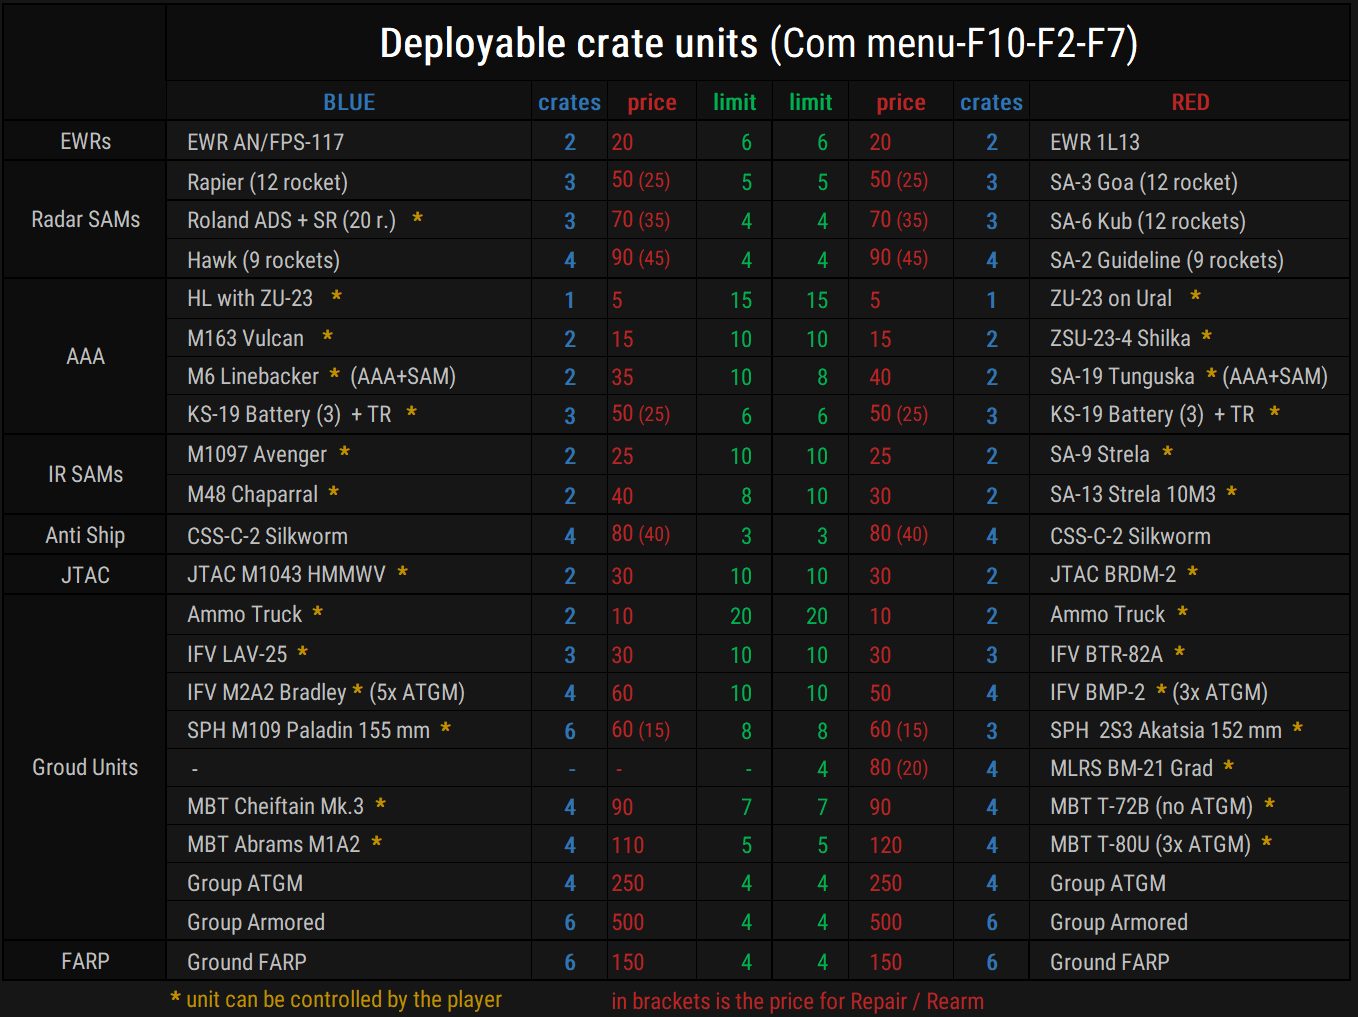
Keep in mind deployable have a point cost to actually unpack. It is important to note that deployable units have global limits and once they reach their limit, the oldest deployable units of the same type will be removed without any point refund. Before placing a new over-limit unit, sell one of your older units of the same type, or inform a teammate about it so that they have the opportunity to sell it. When selling - deleting a unit, its owner will get half of its price back. Deployables also permanently persist and do not disappear unless destroyed or replaced. Deployable crates units can be placed within a minimum distance of 5 km from your own bases (Ground FARPs 10 km), but if the base is under threat, they cannot be deployed within the yellow circle shown on the map, which corresponds to 10 km from the center of the base. When deploying at an enemy base, these distance limits do not apply. Some crates deployable units can be repaired/rearmed if needed by unpacking the corresponding Repair/Rearm crate ( ), which costs half the price of the unit Players do not pay when spawning crates and can therefore cooperate in transporting components. In order for a unit to be unpacked, all its component crates must be within 500 m of each other. The player who unpacks the unit pays for the unit and becomes its owner. If their unit destroys an enemy target, points are credited to the unit owner's account. | |
list of all deployable units from crates(Caucasus-1985 SARH) | |
 | |
📌NOTE: Each player can have a maximum of 8 crates on the map, if they spawn another crate, their oldest crate placed on the map will be automatically deleted! | |
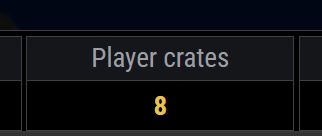 | |
Fowl Logistics Payload Specs | |
If you try to take more Deployables/Repair crates than allowed, the over-limit crate is returned to the ground (the bay is forced open if needed). You’ll get a short panel message; warehouse cargo is not affected. | |
SA342L crates: 1 · troops: 1 · total: 1 SA342M crates: 1 · troops: 1 · total: 1 Mi-24P crates: 1 · troops: 1 · total: 1 UH-1H crates: 1 · troops: 1 · total: 2 Mi-8MT crates: 3 · troops: 3 · total: 3 CH-47Fbl1 crates: 3 · troops: 4 · total: 4
C-101CC crates: 1 · troops: 0 · total: 1 MB-339A crates: 1 · troops: 0 · total: 1 L-39ZA crates: 1 · troops: 0 · total: 1 C-130J-30 crates: 5 · troops: 8 · total: 8 | |
Deployables FARP
During the campaign, it is possible to build a limited number of Ground FARPs on the map, which must be located at least 10 km from any other base. You cannot spawn into helicopters on these forward bases, but you can land within their perimeter and regain your life. To refuel and re-arm, you must be near service trucks. The Deployable FARP has its own warehouse, like other bases, but with a smaller capacity. After it is built, it does not have a full supply, which is gradually replenished by the logistics system. The FARP can be repaired using a repair crate, just like other bases. The Deployable FARP can be destroyed, but it cannot be occupied.There is also a restriction on unpacking deployable units from crates at least 5 km from the center of the base. |
 |
📌NOTE: Some of the FARP's stationary weapons can be boarded and fired manually. The defense also includes one MANPAD and AAA cannons. |
When constructing a Ground FARP, unpacking the crates triggers a placement check to ensure no part of the FARP is over water (even a small creek will trigger this). If the FARP cannot be deployed, a notification is displayed to the player, instructing them to move the placement location further away from the water. |
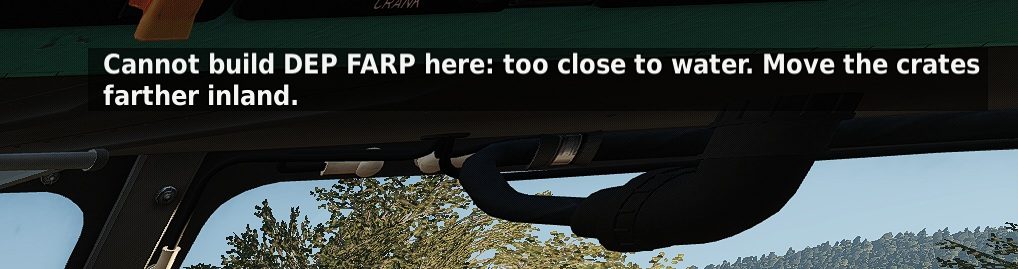 |
If the FARP placement is valid, the player receives a construction start confirmation and has 60 seconds to fly a short distance away to prevent the FARP objects and models from spawning into the player's helicopter. |
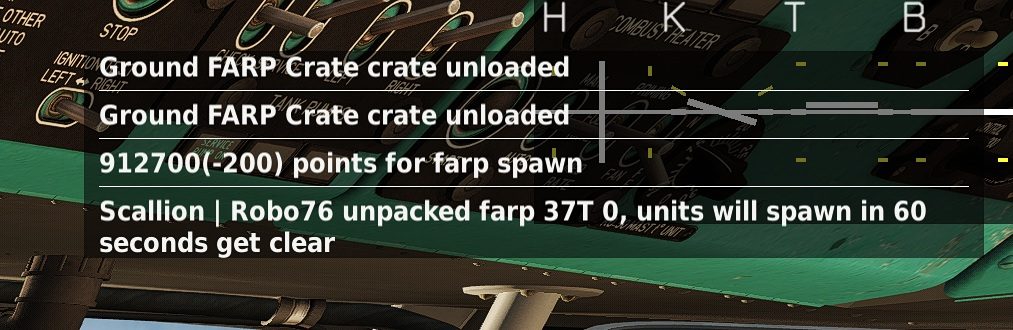 |
EWR
Early Warning Radar A list of detected enemy contacts will be displayed as a message panel periodically. Radio Menu F10 Other → F1 EWR → F1 Report Each row will include the last detection Time, Bearing, Range, barometric Altitude, Speed and Aspect. The EWR will display automatically when there are enemy contacts, and the display frequency will vary depending on how close the enemy units are to the player. If all enemies are far away, the EWR will report every minute. If the player is merged, the EWR will report every 10 seconds. The friendly EWR report will not display automatically, but is available on request from the EWR menu. The EWR report is on by default, but may be disabled via the toggle command
• The type of airframe of the contact is not reported. • Friendly EWR reports are available. | |
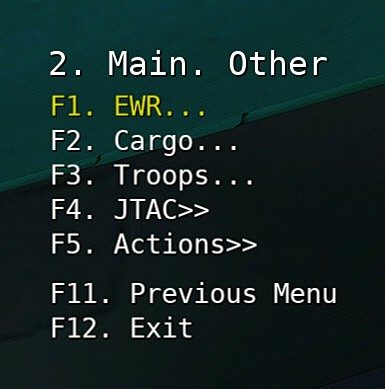 | F1 EWR |
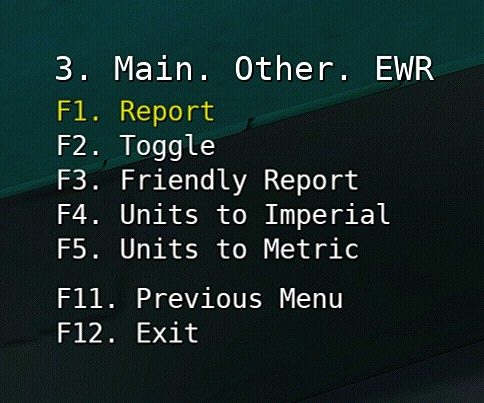 | F1 Report Bandits F3 Report Friendly F4 Set imperial units F5 Set metric units |
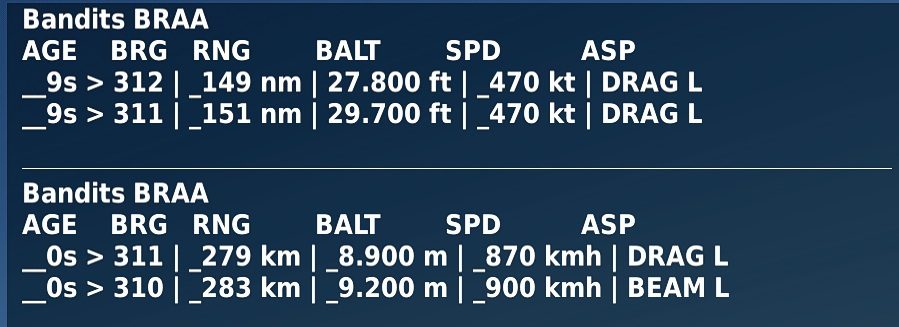 | Imperial units Metric units |
Aspects (Brevity codes) | |
 | |
JTAC
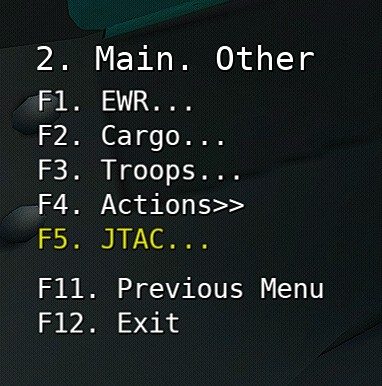
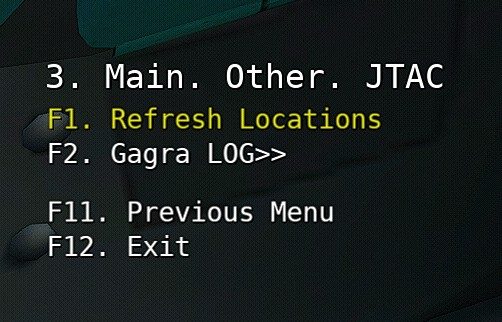
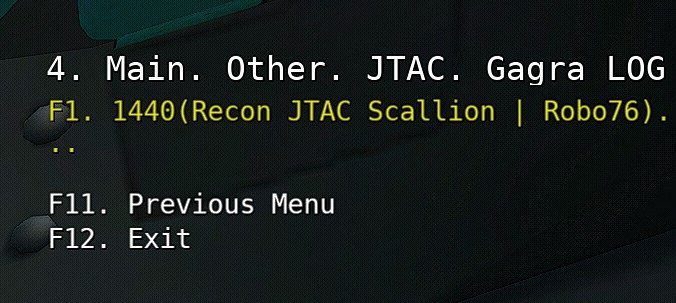
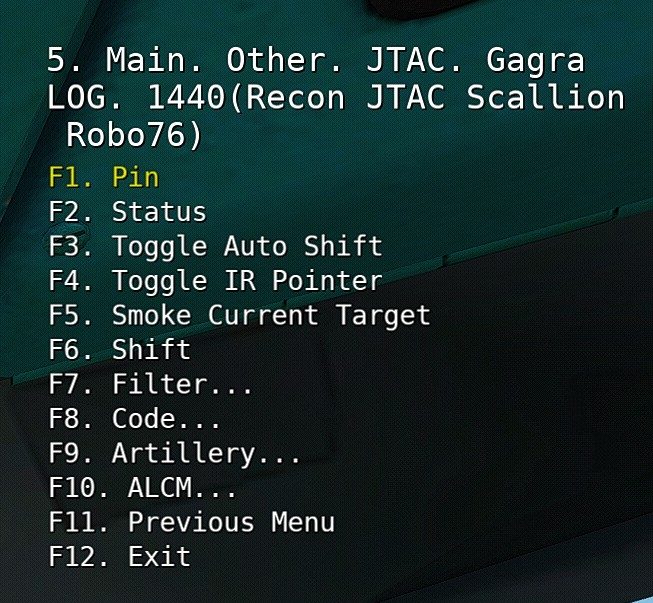
The Joint Terminal Attack Controller (JTAC) system provides advanced targeting, fire coordination, and battlefield intelligence. JTACs are specialized units that: • Detect and track enemy units • Designate targets with laser • Coordinate artillery and missile strikes • Provide detailed target information To deploy a JTAC, you must land any group of soldiers and certain armored units, except for Stingers, which must have a direct line of sight to the target. JTAC (air) Line-of-sight: Not required (can see through terrain) Drone JTAC (MQ-9 Reaper) Range: 18 km (9,72 nm) Cost: 100 points to deploy Function: Long-range surveillance and targeting Recon planes (MB-339A, C-101CC, L-39ZA) Range: 14 km (7,56 nm) Cost: 0 points (player life) Drone-small JTAC (Predator / Wing Loong) Range: 12 km (6,48 nm) Cost: 50 points to deploy Function: Reconnaissance and targeting JTAC (ground) Line-of-sight: require line-of-sight JTAC vehicles ( M1043 HMMWV / BRDM-2) Range: 10 km (5,4 nm) Cost: 30 points to deploy Recon troops Range: 8 km (4,32 nm) Cost: 10 points to deploy Mortar troops Range: 6 km (3,24 nm) Cost: 5 points to deploy Standard troops Range: 4 km (2,16 nm) Cost: 1 points to deploy Anti Tank troops Range: 4 km (2,16 nm) Cost: 3 points to deploy MBT tanks (M1A2 Abrams / T-80U) Range: 1,2 km (0,65 nm) Cost: 110/120 points to deploy MBT tanks (Chieftain Mk.3/ T-72B) Range: 1 km (0,54 nm) Cost: 90 points to deploy IFV vehicles (M2A2 Bradley / BMP-2) Range: 1 km (0,54 nm) Cost: 60 points to deploy IFV vehicles (LAV-25 / BTR-82A) Range: 0,5 km (0,27 nm) Cost: 30 points to deploy
| |
 | |
 | |
 | |
 | |
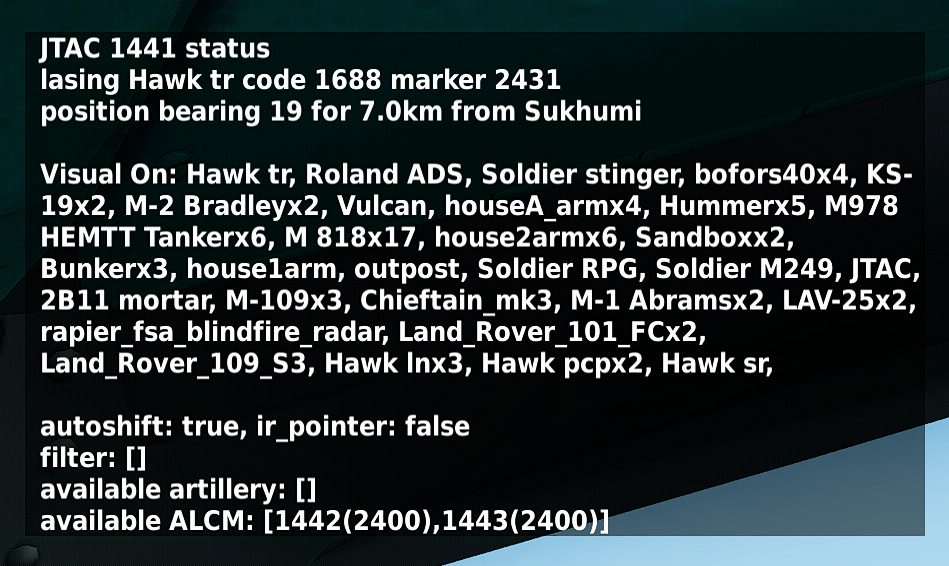 | |
Status Report Shows: • JTAC id • Current target (if any) and Laser code • JTAC position (bearing/distance from objective) • All visual contacts • Autoshift setting and IR pointer setting • Filter settings (if set) • Nearby artillery units (if any) • Nearby cruise missile units (if any) | |
| |
By default, the red coalition JTAC laser code is 1113. | |
| |
-jtac help | prints help |
-jtac 1234 status | JTAC 1234 will list its position, laser code, targets in sight |
-jtac 1234 shift | JTAC 1234 switches to next target |
-jtac 1234 autoshift | JTAC 1234 enables/disables automatic target switching |
-jtac 1234 pointer | JTAC 1234 turns the IR laser pointer on/off |
-jtac 1234 smoke | JTAC 1234 smokes the current target |
-jtac 1234 code 1444 | JTAC 1234 sets the laser code 1444 (DCS valid code range 1111–1788) |
-jtac 1234 arty <groupId|all> <n> | JTAC 1234 calls for artillery support — n rounds (0–255); all = all nearby guns |
-jtac 1234 arty 890 40 | JTAC 1234 calls for artillery support on target using artillery ID 890 and firing 40 rounds |
-jtac 1234 bomber 5678 | JTAC 1234 calls in bomber 5678 mission |
GCI Lazur
GCI Lazur |
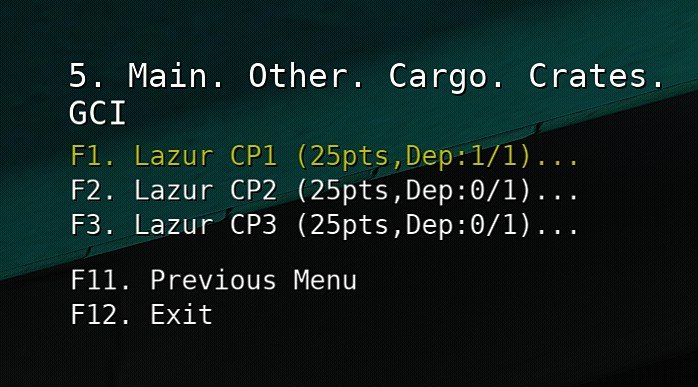 |
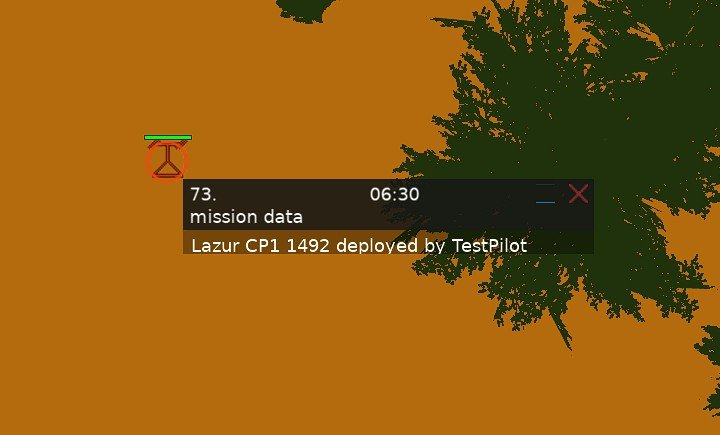
📌NOTE: "Dep:1/1" means 1 out of a maximum 1 GCI unit is already deployed on the map. If you build a new "Lazur CP1" unit under these conditions, the original one will be automatically deleted with no refund. To avoid this, make sure to manually despawn the original unit first using the "action delete" command to get 50% of its cost back. |
The GCI unit number corresponds directly to its channel:
|
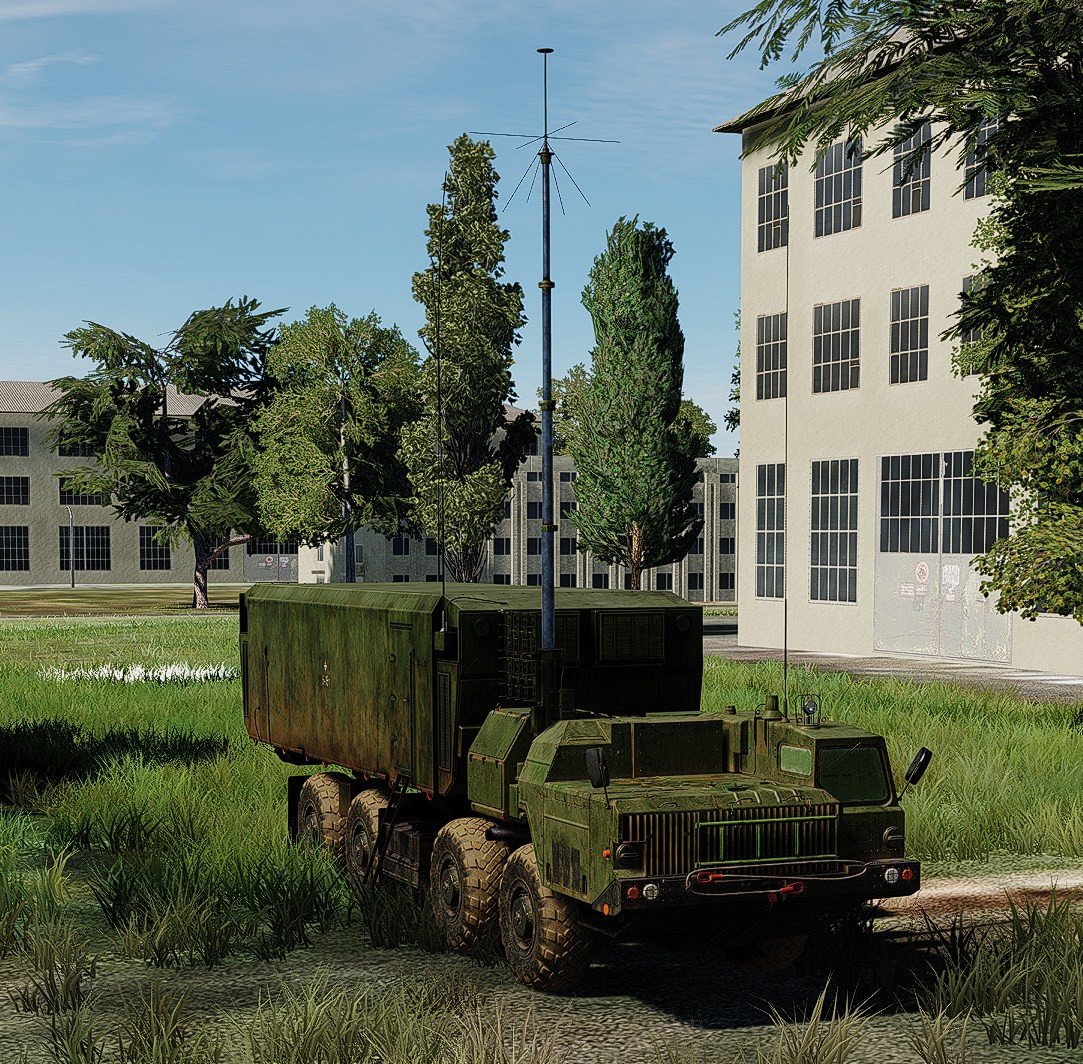 |
⚠️ To operate, the Lazur GCI requires at least 3 operational radar systems within the operational area (EWR or long-range SAM search radars) |
 |
📌NOTE: These ground units cannot be controlled manually via Combined Arms, but you can use the "action move" command to reposition them. |
Artillery Fire Missions
Artillery fire missions allow a JTAC to feed coordinates to artillery (including mortar troops). | |
 | |
map F10 with the deployment of ground units | |
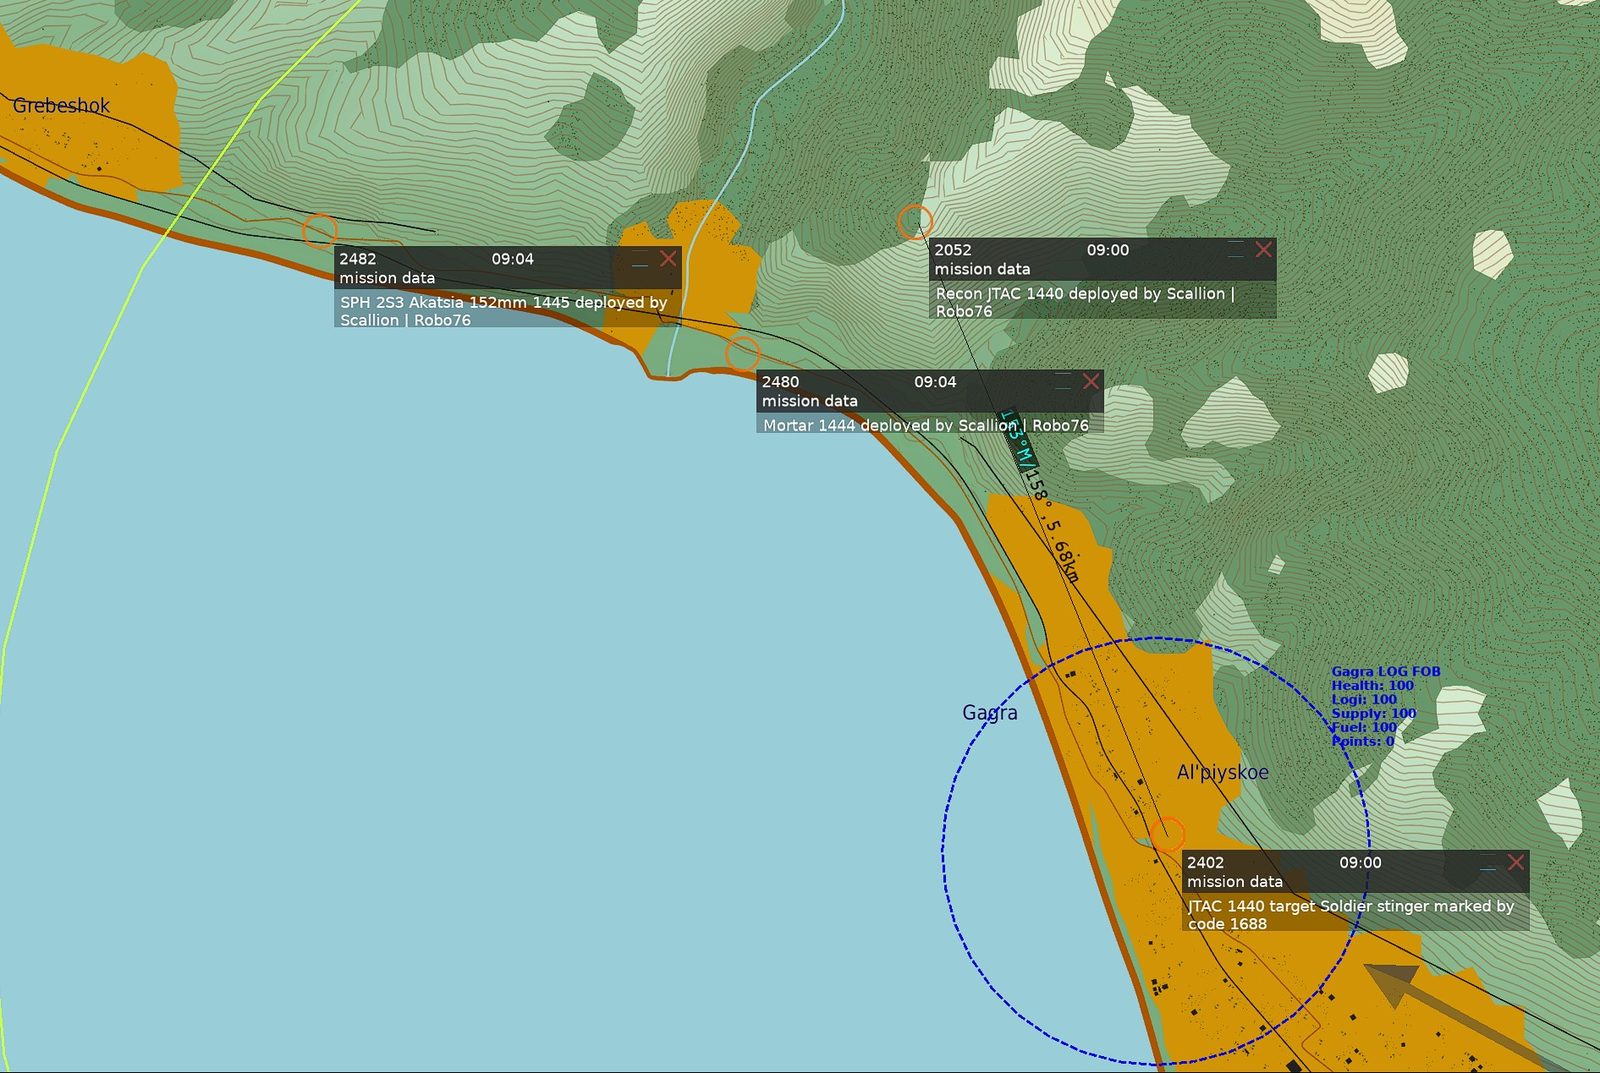 | |
finding unit ID of JTAC unit = 1440 | |
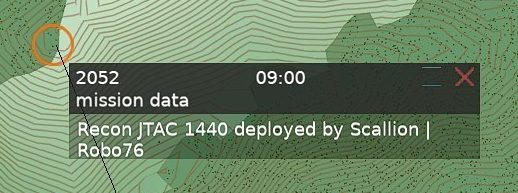 | |
finding unit ID of artillery unit = 1445 | |
 | |
Radio Menu F10 Other → JTAC | |
| Artillery support is called in through the JTAC, which tracks targets. |
| To update, you need to repeat the selection until the current options are available. |
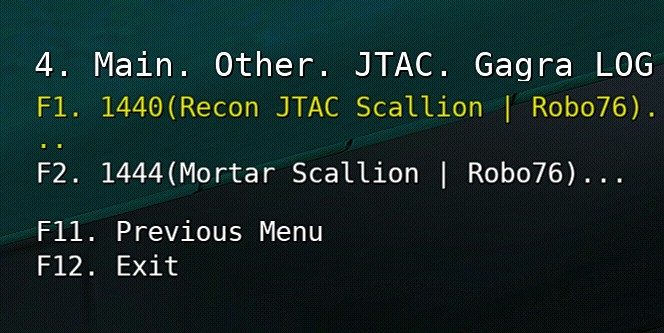 | To update, you need to repeat the selection until the current options are available. |
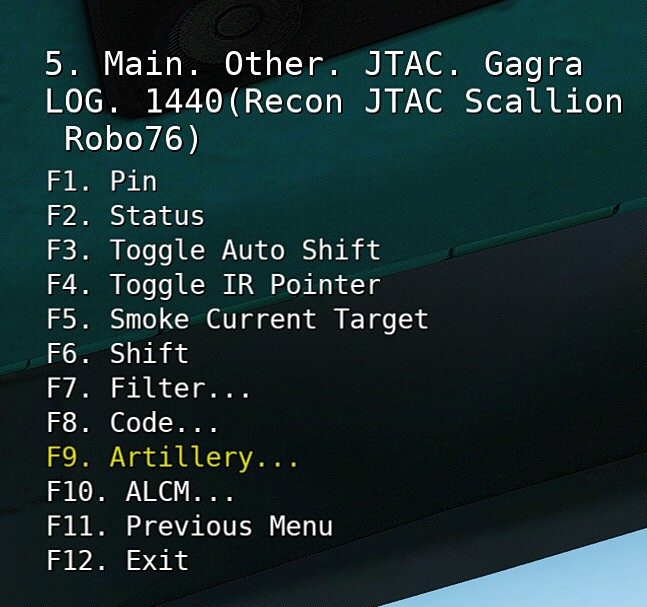 | After selecting a JTAC unit, you can change the target selection to focus on using F7. Filter... |
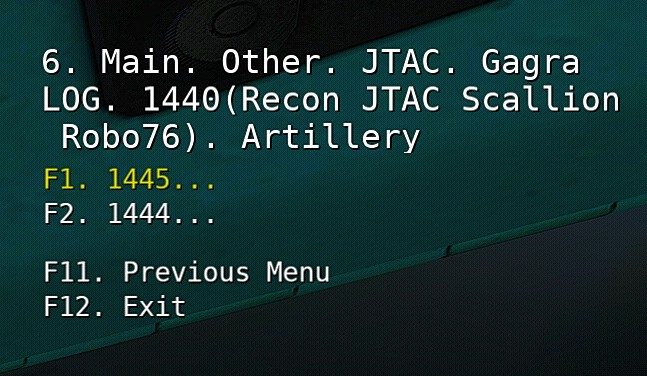 | Opening the JTAC artillery menu will show a list of artillery that is in range of the JTAC’s current target. (artillery unit ID 1445 → SPH 2S3 Akatsia 152 mm selected) |
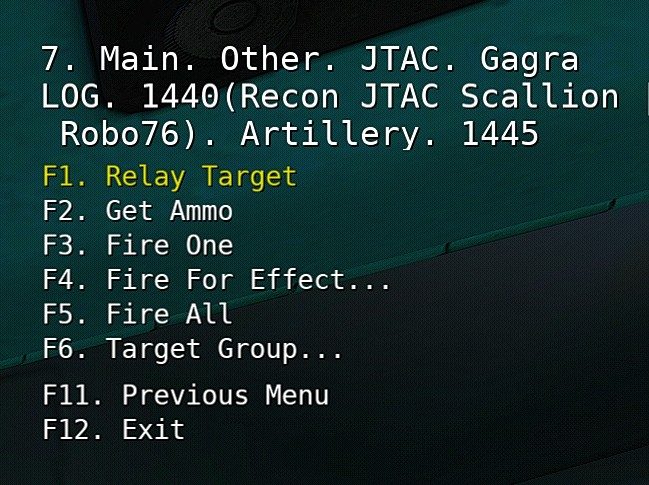 | Commands for controlling artillery support. |
The initial solution computed by DCS may not be accurate, so you have options to refine the solution by reporting the results of test shots to the jtac. Once your solution is refined you may fire 5, 10, or 20 shots from the F4. Fire For Effect… menu. | |
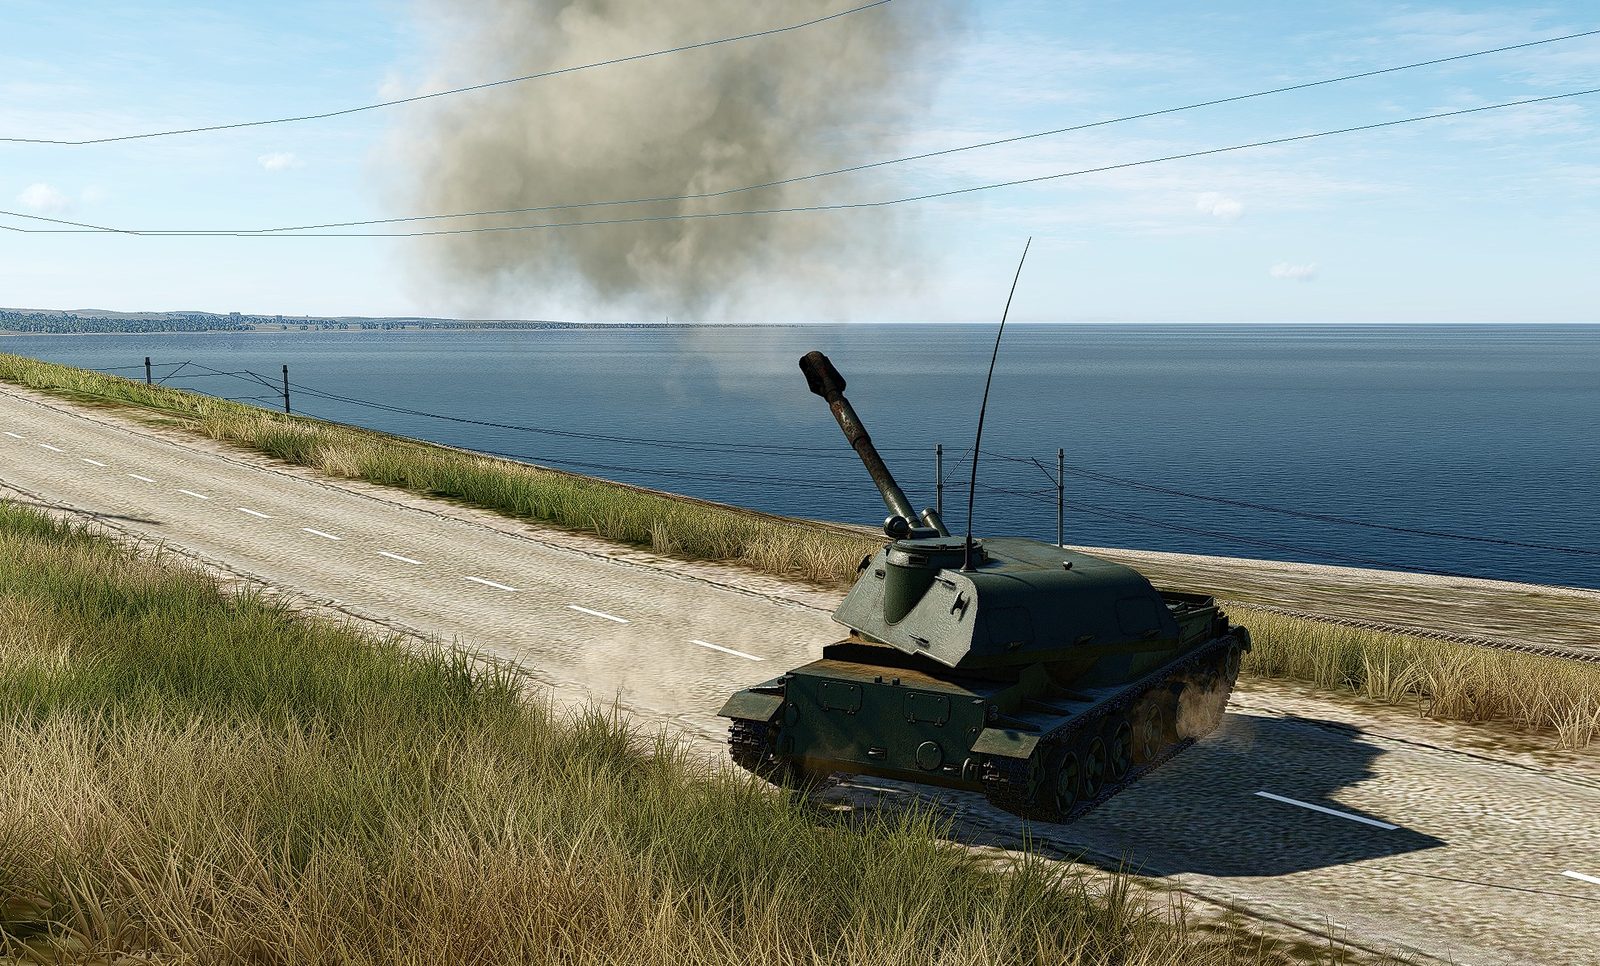 | |
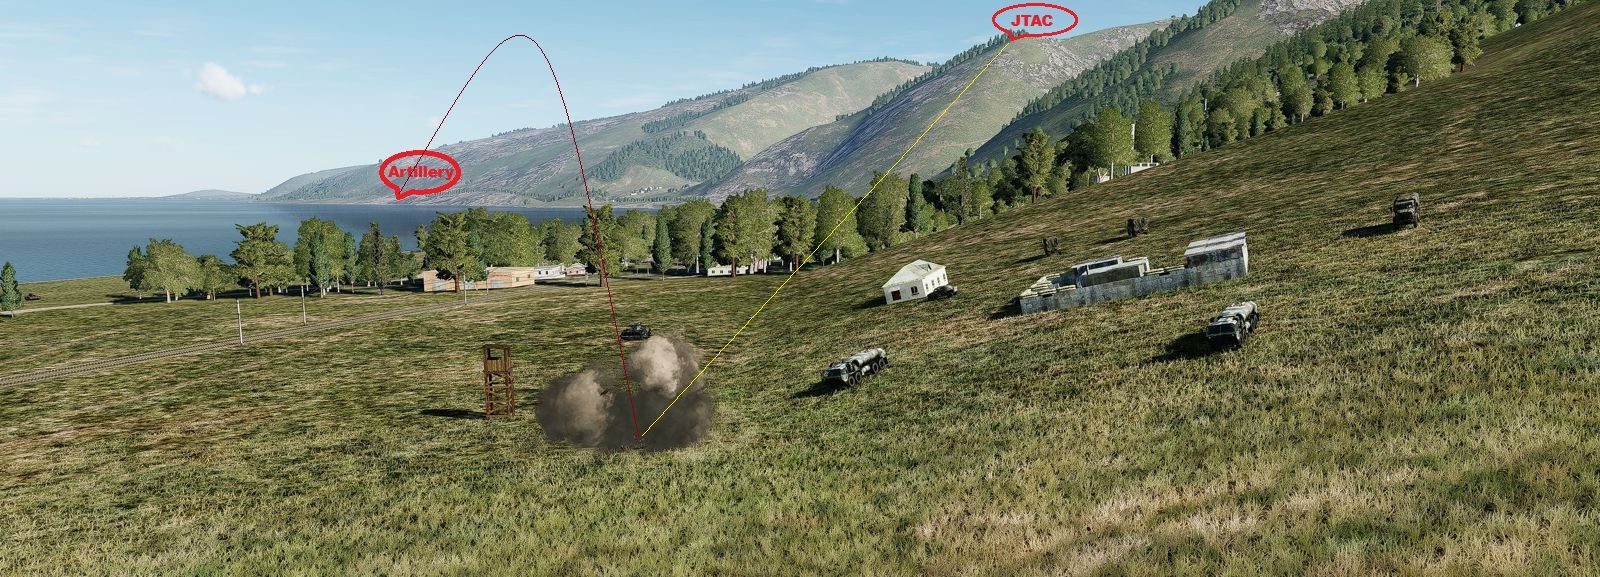 | |
📌NOTE: In order for the JTAC unit to see targets, it must have a line of sight to them that is unobstructed by terrain. Artillery units fire along a ballistic trajectory and can be effectively concealed behind terrain. | |
Tacview Records
 Tacview is a flight data analysis tool used to record and review battlefield events. The basic version is available as a free download here: Tacview is a flight data analysis tool used to record and review battlefield events. The basic version is available as a free download here:
|
📌NOTE: If Tacview is running on your client, it will only record your own aircraft because server-side data export is disabled. Additionally, active Tacview recording can cause local performance issues due to simultaneous data writing. To ensure optimal performance on the ATTRITION server, please disable local Tacview recording, as server restrictions prevent it from capturing full match data anyway. |
Live campaign map - Tacview icon |
 |
|
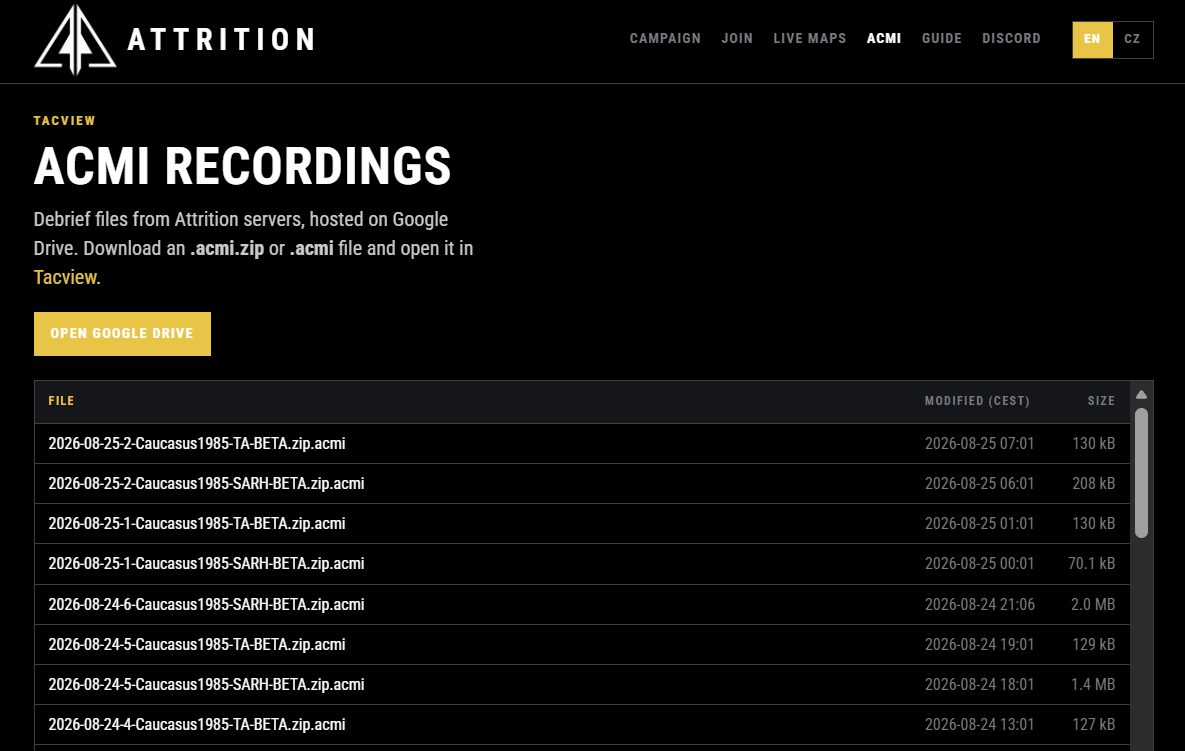 |
Download from Google Drive |
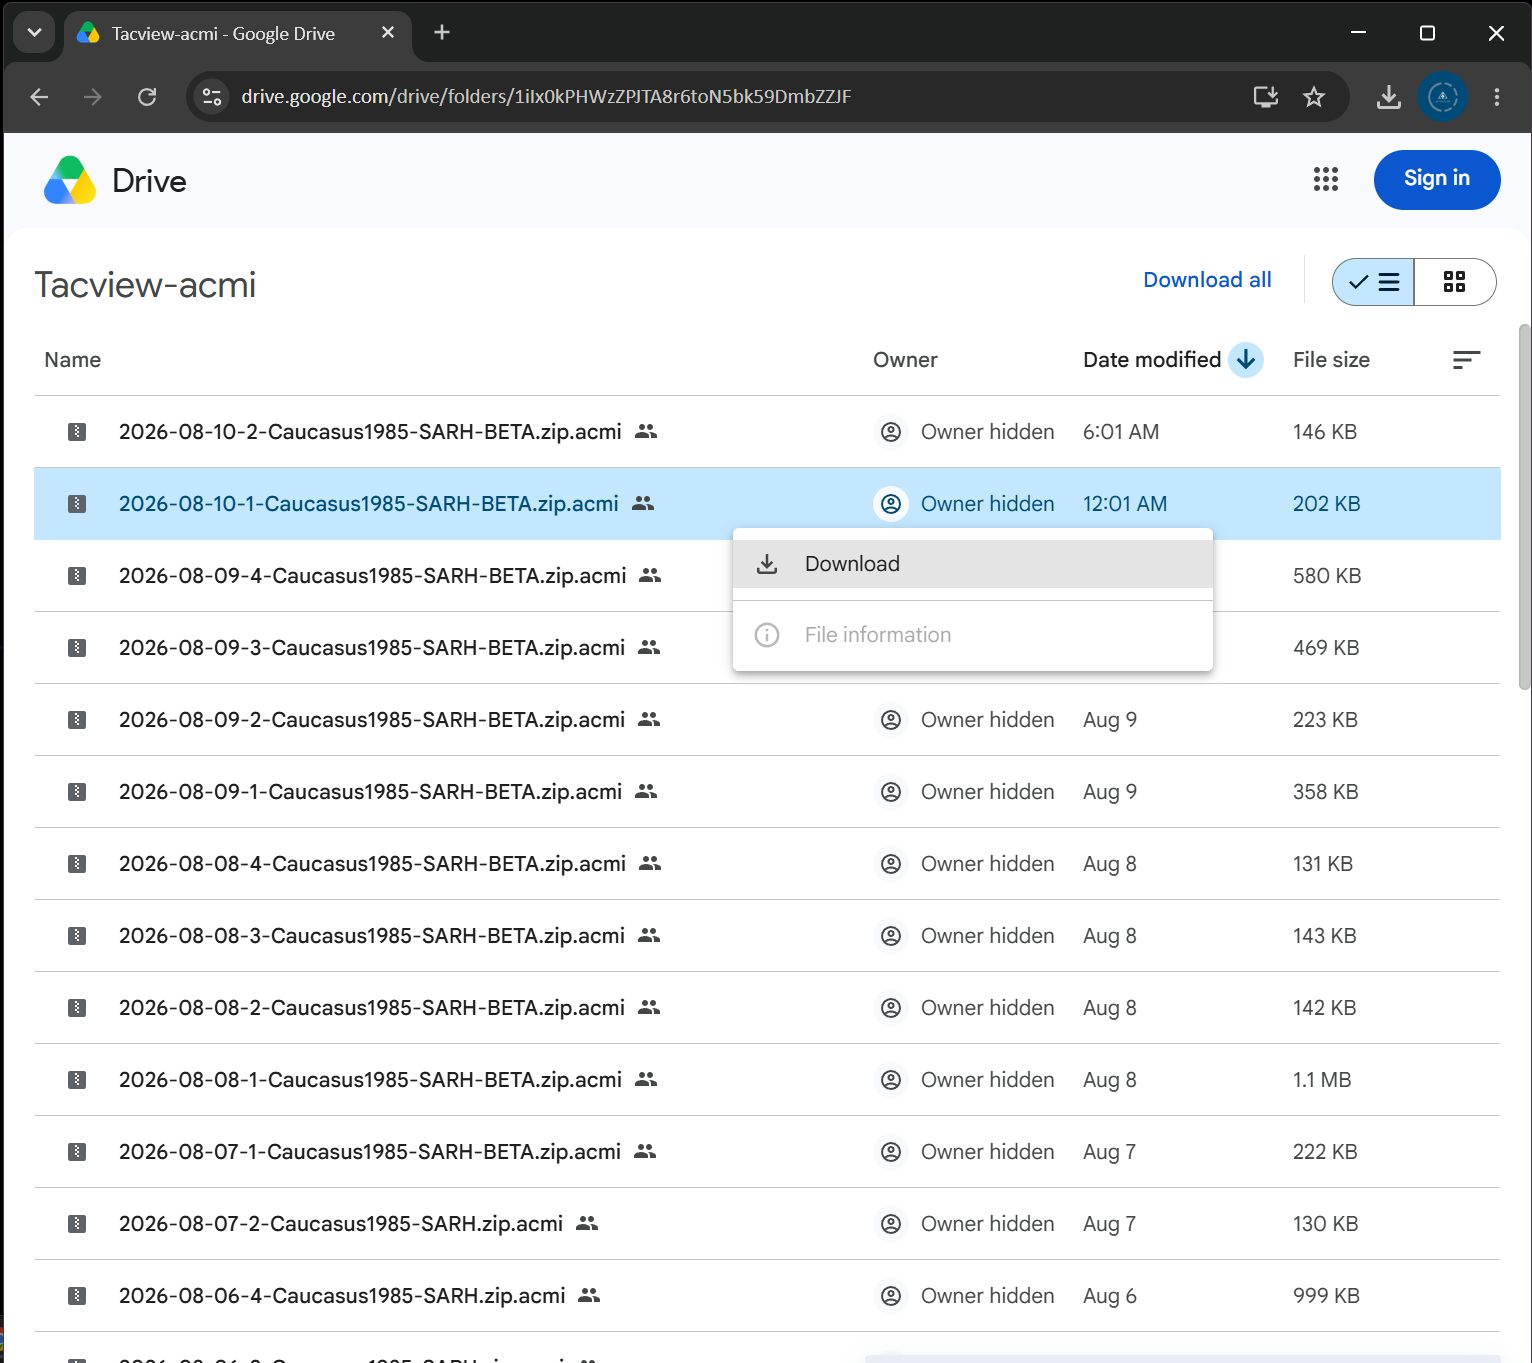 |
open the ACMI recording file in Tacview |
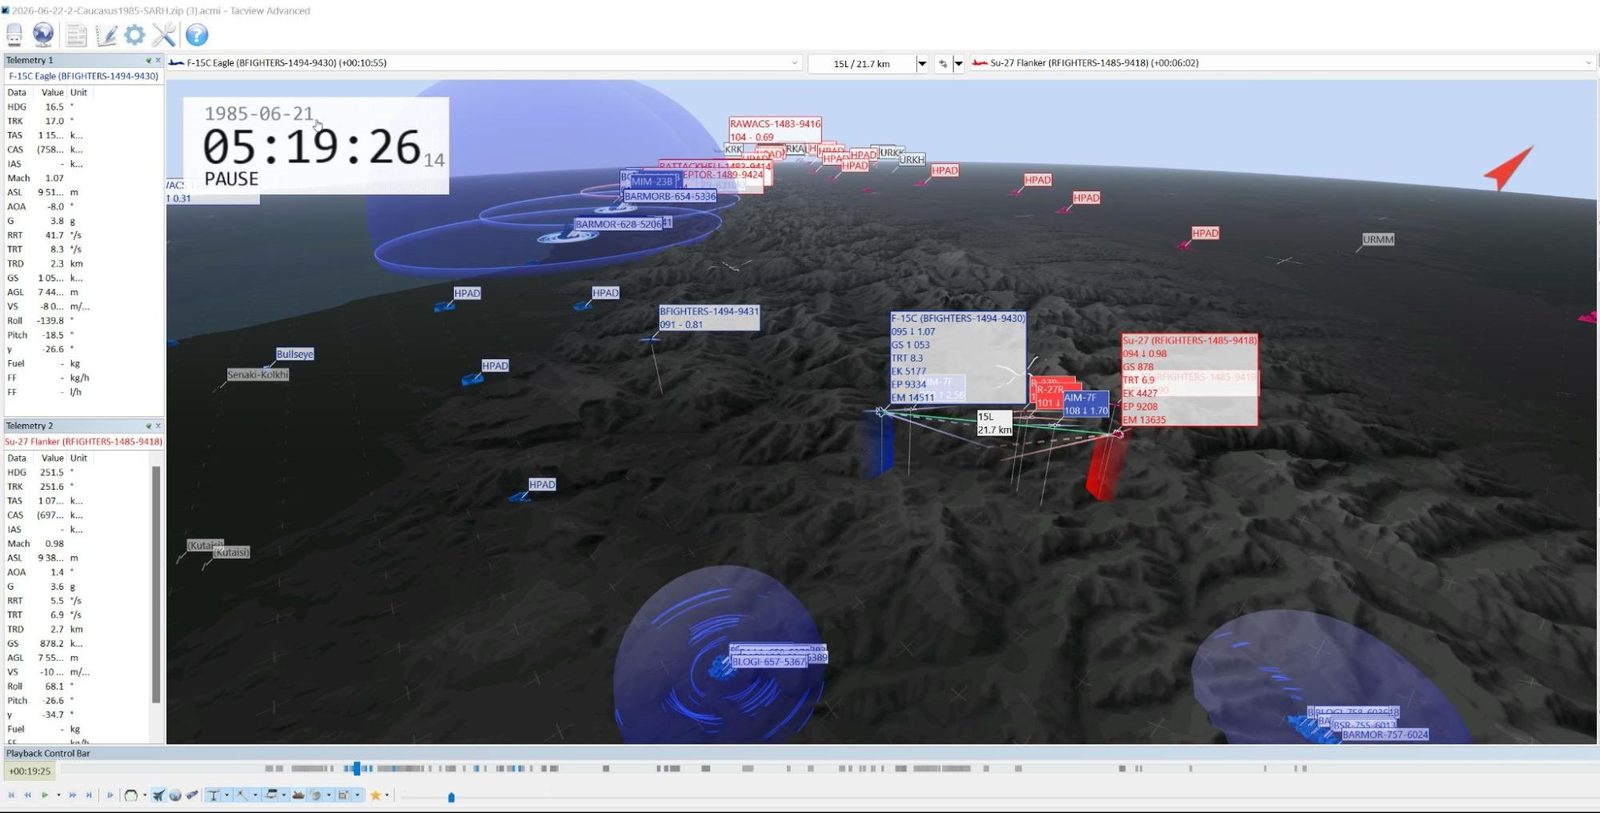 |
Penalty Systems
Friendly fire If a player teamkills an allied player, lives are deducted from the offender instead of points, matching the life class of the victim. A second player teamkill within the 24-hour window results in a 2-life deduction from that same class. A third incident results in a 3-life deduction, and so on. If the offender has no remaining lives in that specific class, lives will be deducted from other classes in the following order: Standard → Attack → Intercept → Recon → Logistics. After 24 hours have passed since the initial incident, the player's friendly fire history is completely reset. This penalty system is fully automated, so isolated friendly fire incidents do not need to be reported to staff. However, if a player's behavior is found to be persistent or malicious—verified via Tacview records and server logs—the offender may face a campaign suspension in accordance with the server rules.
|
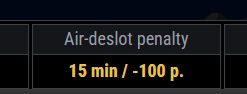
The penalty is a 15-minute slot ban and a 100-point fine. |
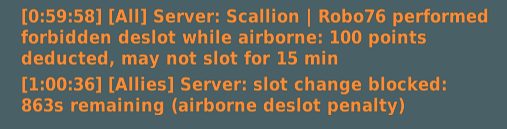 |
 |
📌NOTE: Die like men, not like cowards. |
